> ## Documentation Index
> Fetch the complete documentation index at: https://koreai-ai-for-process-dev.mintlify.app/llms.txt
> Use this file to discover all available pages before exploring further.
# Configuring the Genesys Agent
[Back to Agent Transfer Integrations](/ai-for-service/integrations/overview#agent-transfer)
The Genesys Agent integration allows you to hand off AI Agent conversations to live agents on Genesys Cloud (Voice, Web, and VoIP telephony).
The platform supports two Genesys integration methods:
* **WebChat**: Real-time text chat with queue-based routing. Agents can handle multiple chats and transfer to other agents or queues without interrupting the customer.
* **Web Messaging**: Asynchronous/real-time messaging with persistent chat history. Agents can respond across sessions and transfer conversations without losing context.
### Current Limitations (Web Messaging)
The following features are not yet supported:
* Resuming the same interaction again
* Rich Media Messaging
***
## Configuration
### Step 1: Add the Genesys Cloud Login URL
1. Log in to your Genesys Cloud account. Note the login URL from the browser address bar (e.g., `https://login.mypurecloud.com`).
2. Save this URL for later. Alternatively, find your region-specific URL via [Genesys Cloud region URLs](https://help.mypurecloud.com/articles/aws-regions-for-genesys-cloud-deployment/#tab2).
### Step 2: Retrieve the Organization ID
1. Follow [Find your Organization ID](https://help.mypurecloud.com/faqs/how-do-i-find-my-organization-id/) to retrieve your org ID.
2. Save it for later.
### Step 3: Create a Queue
1. Navigate to **Admin > Contact Center > Queues**.
2. Click **Create Queue**. Enter a queue name and select a division.
3. Click **Save** and open the Queue settings screen.
4. Assign agents or groups as queue members.
5. Configure routing methods and other settings as needed.
6. Click **Save**. Note the queue name.
### Step 4: Create an Inbound Message Flow
1. Navigate to **Admin > Architect**.
2. Hover over **Flows** and select **Inbound Message Flow**.
3. Click **Add**, enter a name and optional description, and select a division.
4. Click **Create Flow**.
5. In the flow editor, add a **Transfer to ACD** action and select the target queue.
6. Configure any additional logic or error handling.
7. Validate and **Publish** the flow.
### Step 5: Create a Deployment Key
#### For WebChat
1. Navigate to **Admin > Contact Center > Widgets**.
2. Click **Create Widget**, select **Third Party** as the widget type, and save.
3. In the widget settings, select **Route to Flow** and choose the Inbound Message flow.
4. Copy the generated **Deployment Key**.
#### For Web Messaging
1. Navigate to **Admin > Message > Messenger Configurations** and click **New Configuration**.
2. Enter a name and description. Under **Labels & Languages Support**, select supported languages and set the default.
3. In the **Apps** tab, set Conversation Disconnect to *Display conversation status and disconnect session*. Click **Save**.
4. Navigate to **Admin > Message > Messenger Deployments** and click **Create New Deployment**.
5. Enter a name, select your Messenger configuration, and set **Supported Content Profile** to `WebMessaging Legacy Default`.
6. Set domain restrictions as needed.
7. For **Select your Architect Flow**, choose the inbound message flow you created.
8. Click **Save** to generate the Deployment Key. Copy it.
### Step 6: Add the WebSocket URL (Web Messaging only)
Skip this step if you are configuring WebChat.
1. Find your region's WebSocket URL at [Genesys WebSocket Region Info](https://developer.genesys.cloud/commdigital/digital/webmessaging/websocketapi#connecting).
2. Copy the WebSocket URL (e.g., `wss://streaming.mypurecloud.com/v2/websocket`).
### Step 7: Enable the Genesys Agent
1. Log in to the [Kore.ai XO Platform](https://bots.kore.ai/botbuilder).
2. Select the AI Agent to configure.
3. Navigate to **App Settings > Integrations > Agent Transfer > Chat** and select **Genesys**.
4. On the **Configurations** tab, enter:
| Field | Description |
| ----------------------- | ---------------------------------------- |
| Genesys Cloud login URL | Your Genesys AWS region URL (mandatory). |
| Organization ID | Your Genesys organization ID. |
| Deployment ID | Your Genesys deployment ID. |
| Queue Name | The queue name created in Step 3. |
| Genesys Web socket URL | WebSocket URL (Web Messaging only). |
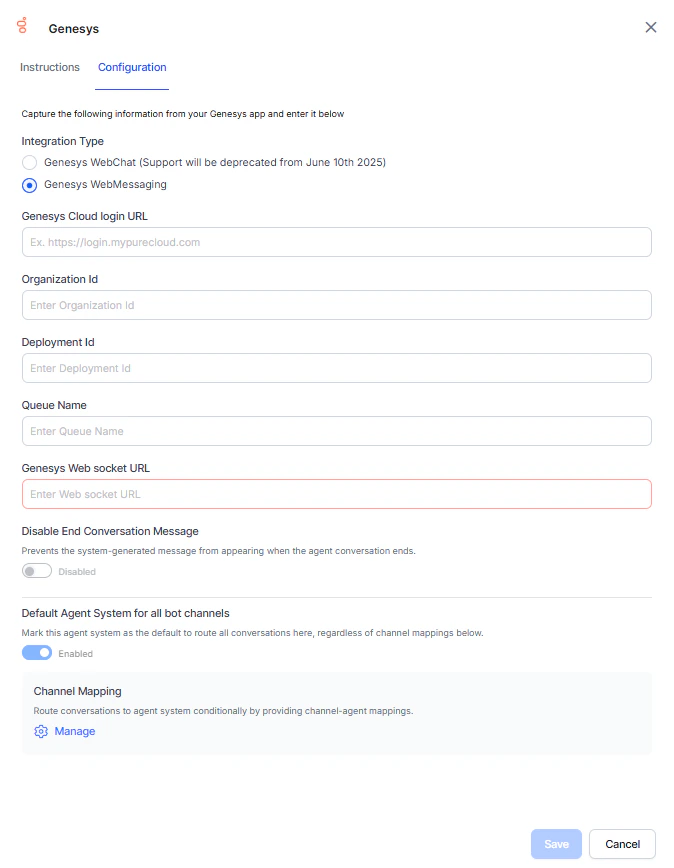 5. To stop displaying the session closure message after an agent conversation ends, enable the **Disable End Conversation Message** option.
6. To make Genesys the default agent, enable **Default Agent System for all bot channels**.
This option is only available when multiple agents are configured.
7. Click **Manage** to map channels to the Genesys agent. See [Adding channels to your app](/ai-for-service/channels/adding-channels-to-your-bot).
8. Click **Done**.
9. Click **Save** to enable the Genesys agent.
10. Publish the app. See [Publishing App](/ai-for-service/deployment/publishing-app#publishing-your-app).
***
## Verify the Integration
1. Open the AI Agent with Genesys enabled.
2. Create an Agent Transfer Node task (e.g., a `PlatformAgent` task with an `AgentTransfer` node configured to use Genesys). See [Agent Transfer Node](/ai-for-service/automation/dialogs/node-types/agent-transfer-node#agent-transfer-node).
5. To stop displaying the session closure message after an agent conversation ends, enable the **Disable End Conversation Message** option.
6. To make Genesys the default agent, enable **Default Agent System for all bot channels**.
This option is only available when multiple agents are configured.
7. Click **Manage** to map channels to the Genesys agent. See [Adding channels to your app](/ai-for-service/channels/adding-channels-to-your-bot).
8. Click **Done**.
9. Click **Save** to enable the Genesys agent.
10. Publish the app. See [Publishing App](/ai-for-service/deployment/publishing-app#publishing-your-app).
***
## Verify the Integration
1. Open the AI Agent with Genesys enabled.
2. Create an Agent Transfer Node task (e.g., a `PlatformAgent` task with an `AgentTransfer` node configured to use Genesys). See [Agent Transfer Node](/ai-for-service/automation/dialogs/node-types/agent-transfer-node#agent-transfer-node).
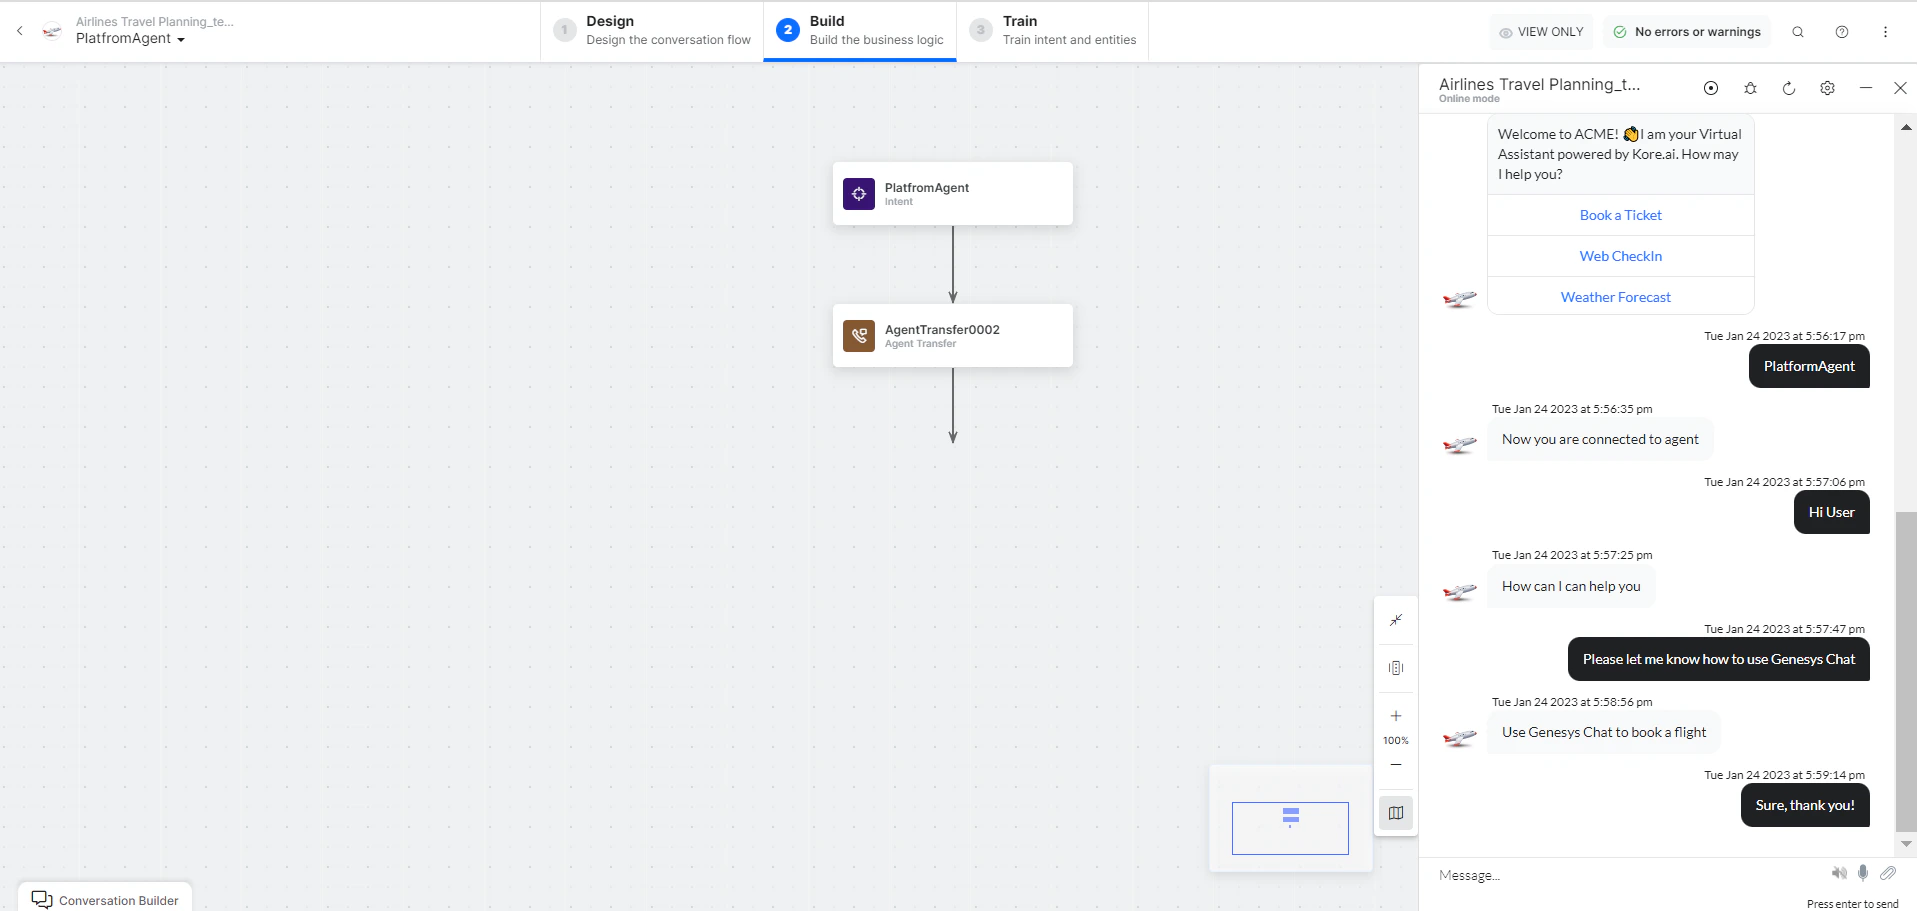
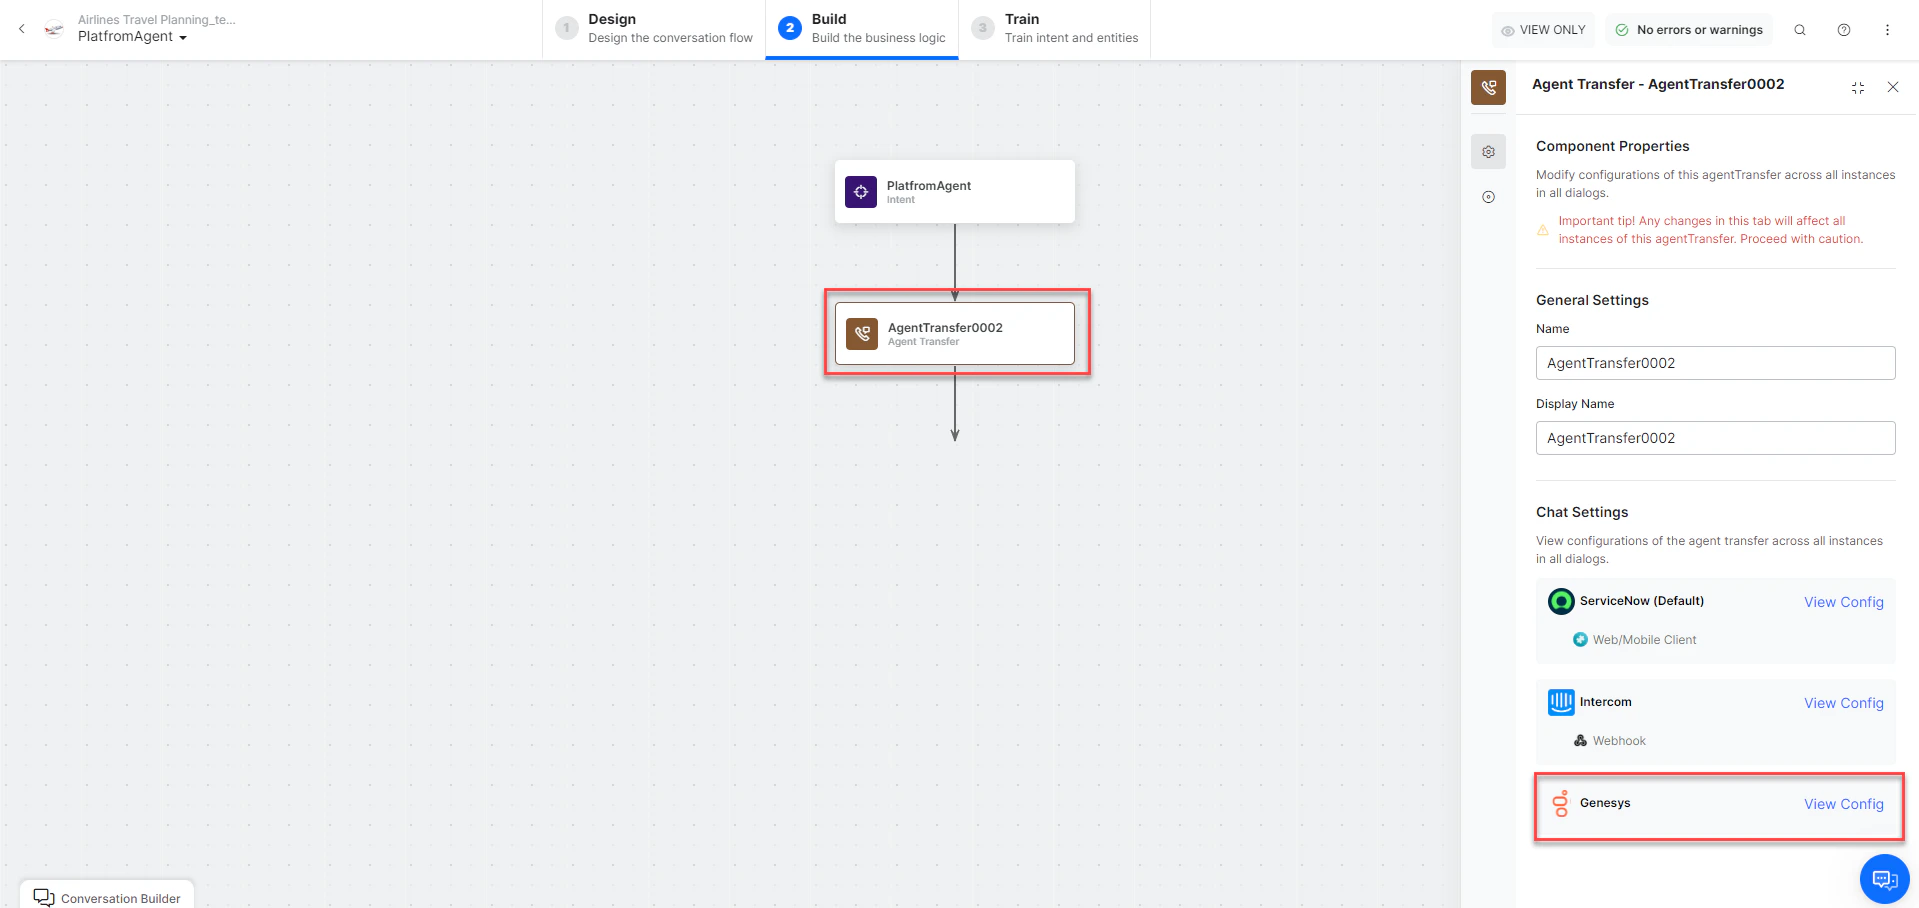 3. Click **Talk to Bot** and enter **Help**.
4. When the transfer dialog is invoked, the conversation routes to Genesys and the agent receives a notification.
5. The connection is established and the conversation continues. When an agent begins interacting with a user, the system generates a message ID and exposes it as a context variable `{{context.session.BotUserSession.agentHandoffMeta.messageId}}`. You can pass this message ID as a parameter in the service node to retrieve details of the agent who handled the conversation.
3. Click **Talk to Bot** and enter **Help**.
4. When the transfer dialog is invoked, the conversation routes to Genesys and the agent receives a notification.
5. The connection is established and the conversation continues. When an agent begins interacting with a user, the system generates a message ID and exposes it as a context variable `{{context.session.BotUserSession.agentHandoffMeta.messageId}}`. You can pass this message ID as a parameter in the service node to retrieve details of the agent who handled the conversation.
 ***
## Additional Capabilities
### Metadata / User Information Transfer
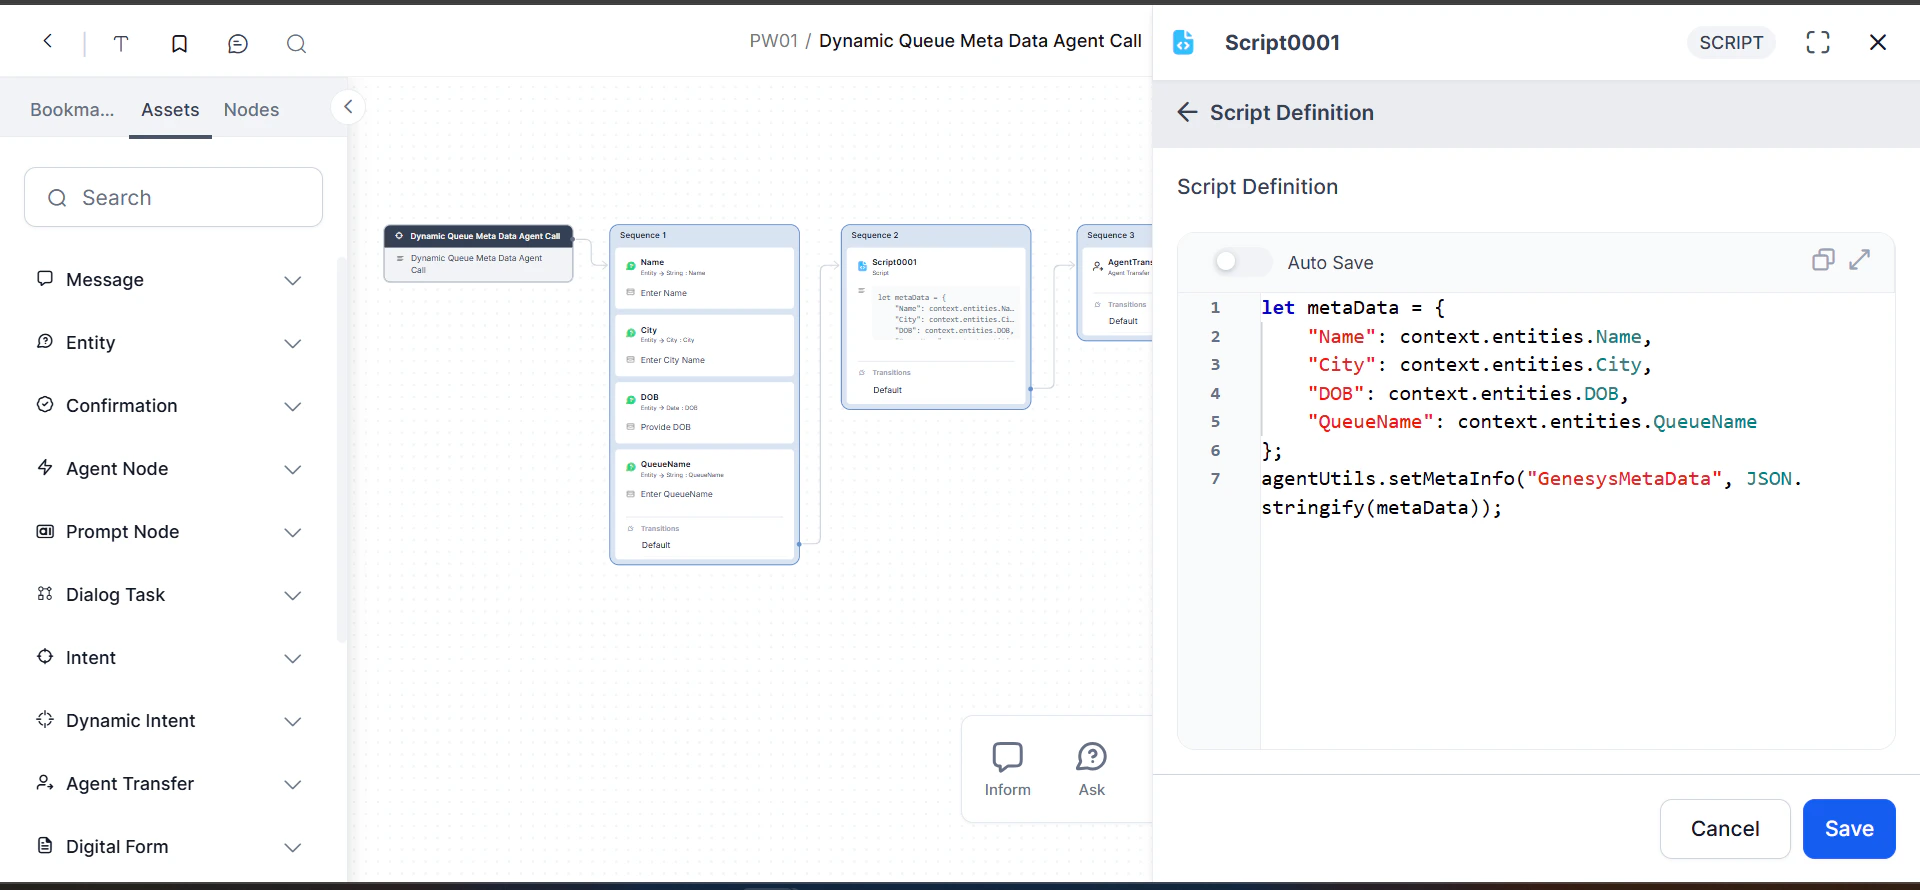
Use the `GenesysMetaData` object with `agentUtils.setMetaInfo` to pass context to agents during handoffs. This can be called anywhere the platform supports JavaScript.
**Sample script (Script node):**
```javascript theme={null}
let metaData = {
"EmployeeID": context.entities.EmployeeID,
"Department": context.entities.Department
};
agentUtils.setMetaInfo("GenesysMetaData", JSON.stringify(metaData));
```
***
## Additional Capabilities
### Metadata / User Information Transfer
Use the `GenesysMetaData` object with `agentUtils.setMetaInfo` to pass context to agents during handoffs. This can be called anywhere the platform supports JavaScript.
**Sample script (Script node):**
```javascript theme={null}
let metaData = {
"EmployeeID": context.entities.EmployeeID,
"Department": context.entities.Department
};
agentUtils.setMetaInfo("GenesysMetaData", JSON.stringify(metaData));
```
 **Accessing metadata in Genesys:**
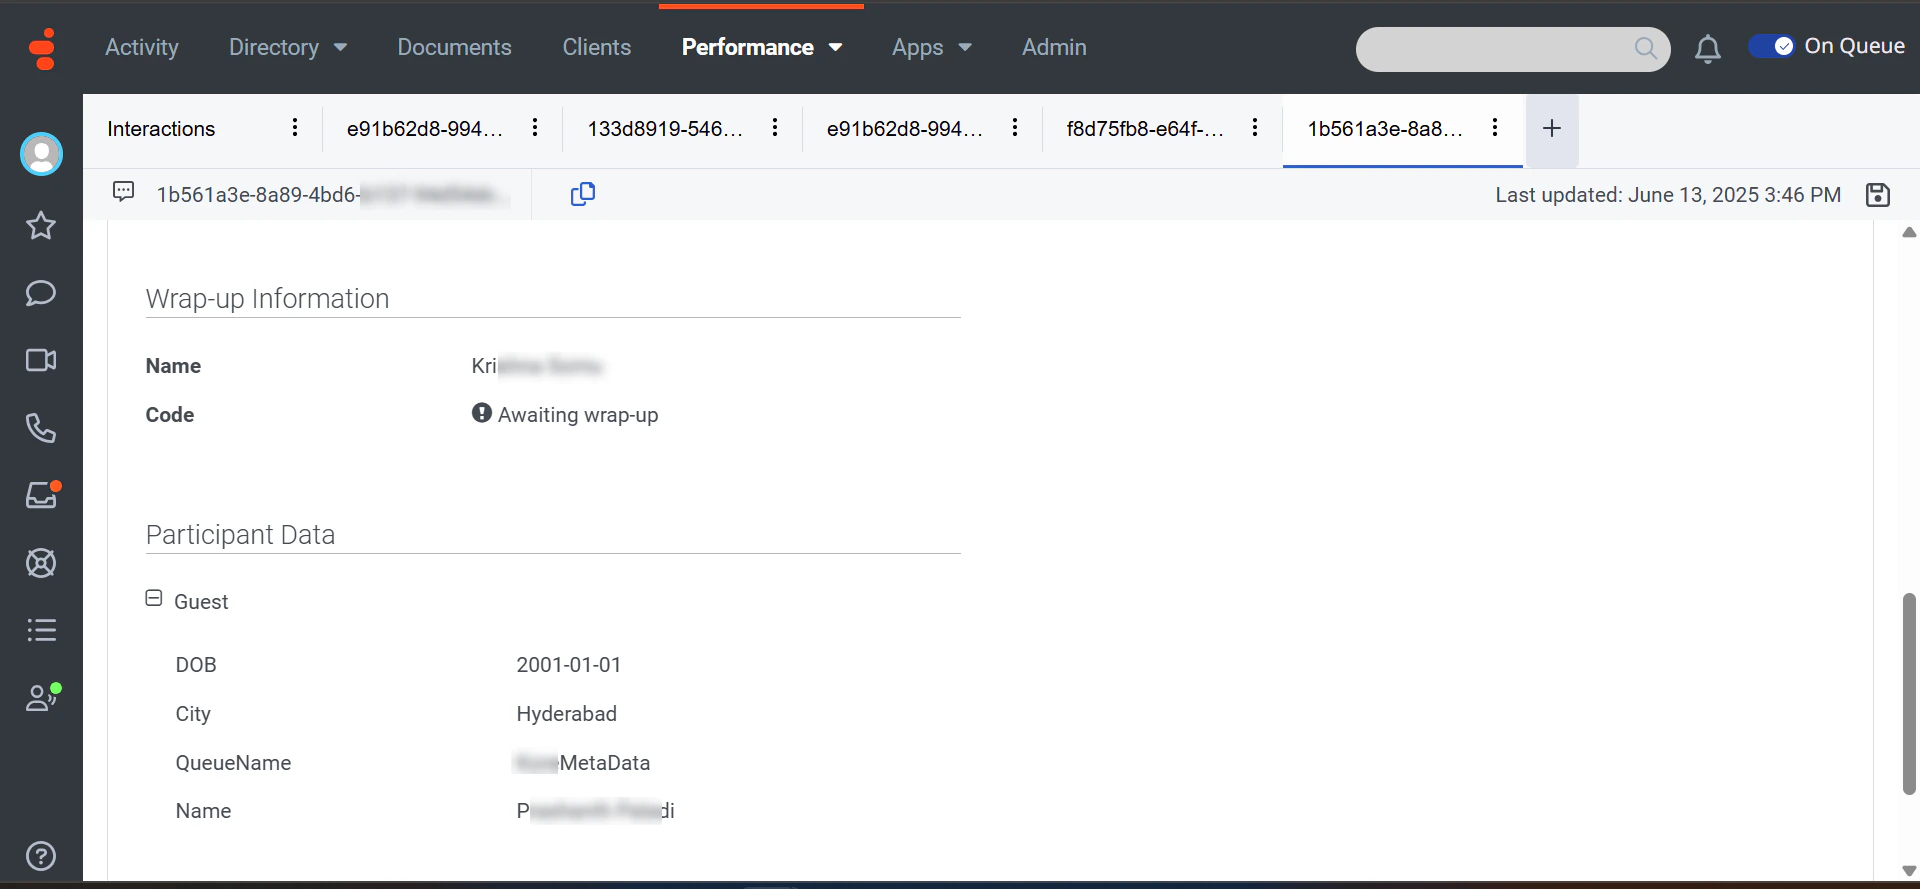
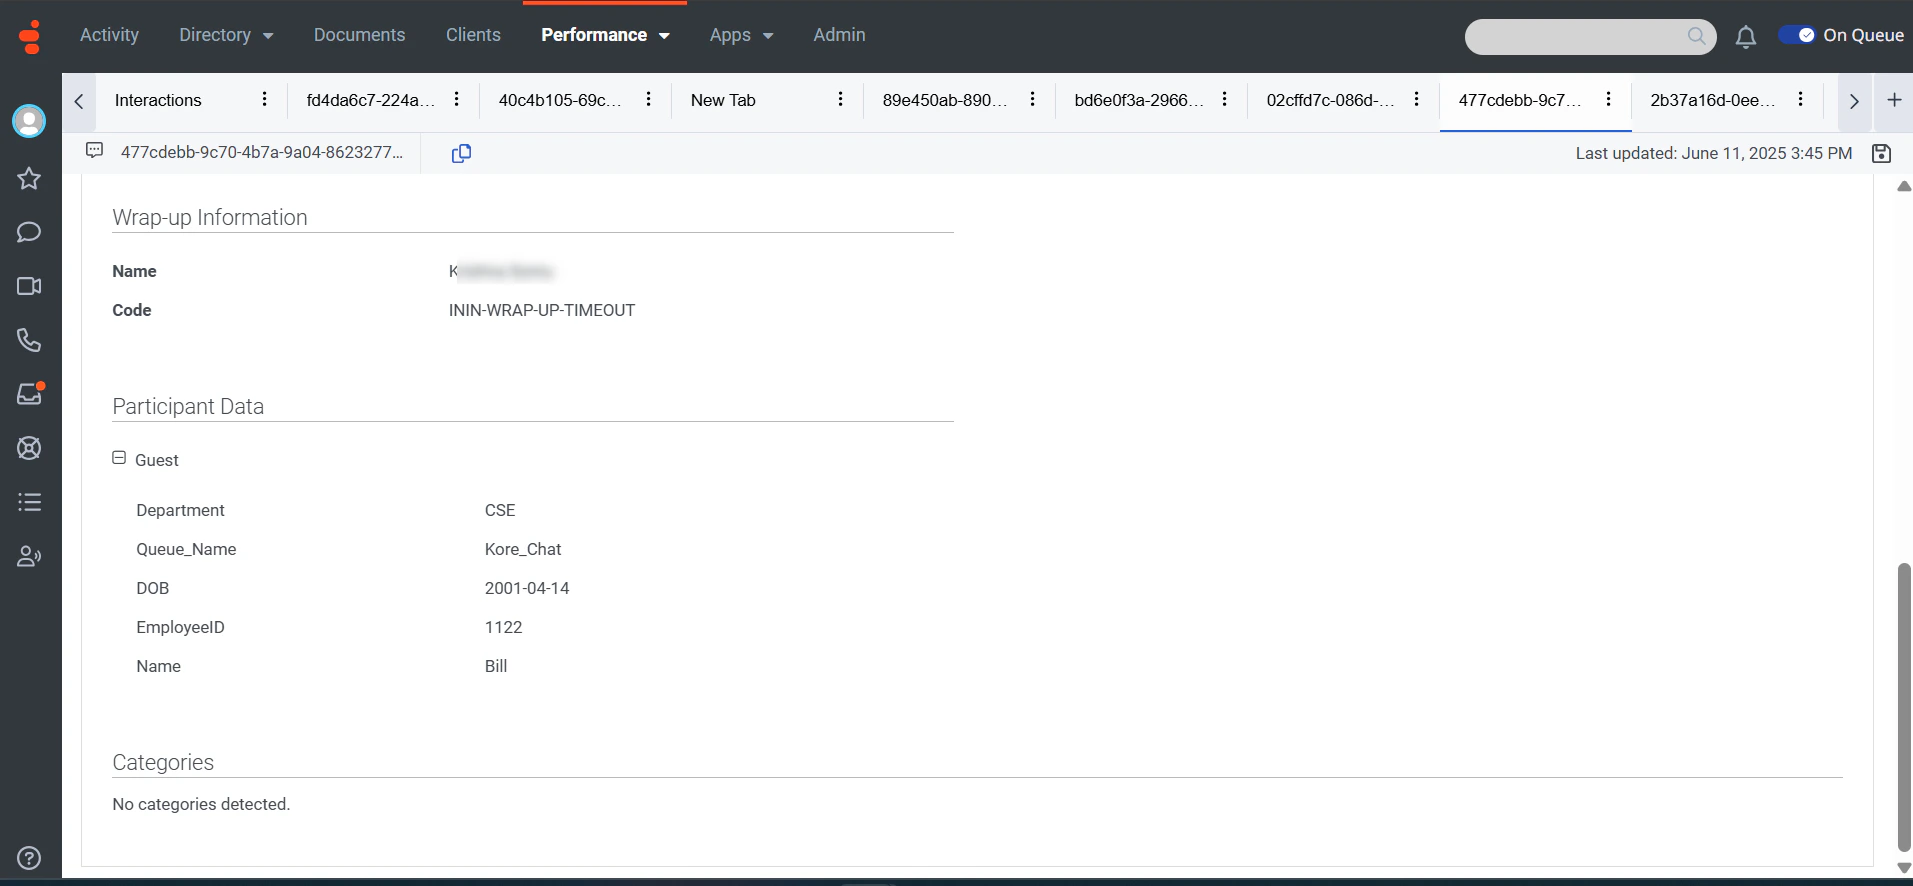
After transfer, metadata appears in **Participant Data**. Navigate to **Admin > Performance > Workspace > Interactions > \[Interaction] > Participant Data**.
**Accessing metadata in Genesys:**
After transfer, metadata appears in **Participant Data**. Navigate to **Admin > Performance > Workspace > Interactions > \[Interaction] > Participant Data**.
 To map metadata to flow variables before transferring to an agent:
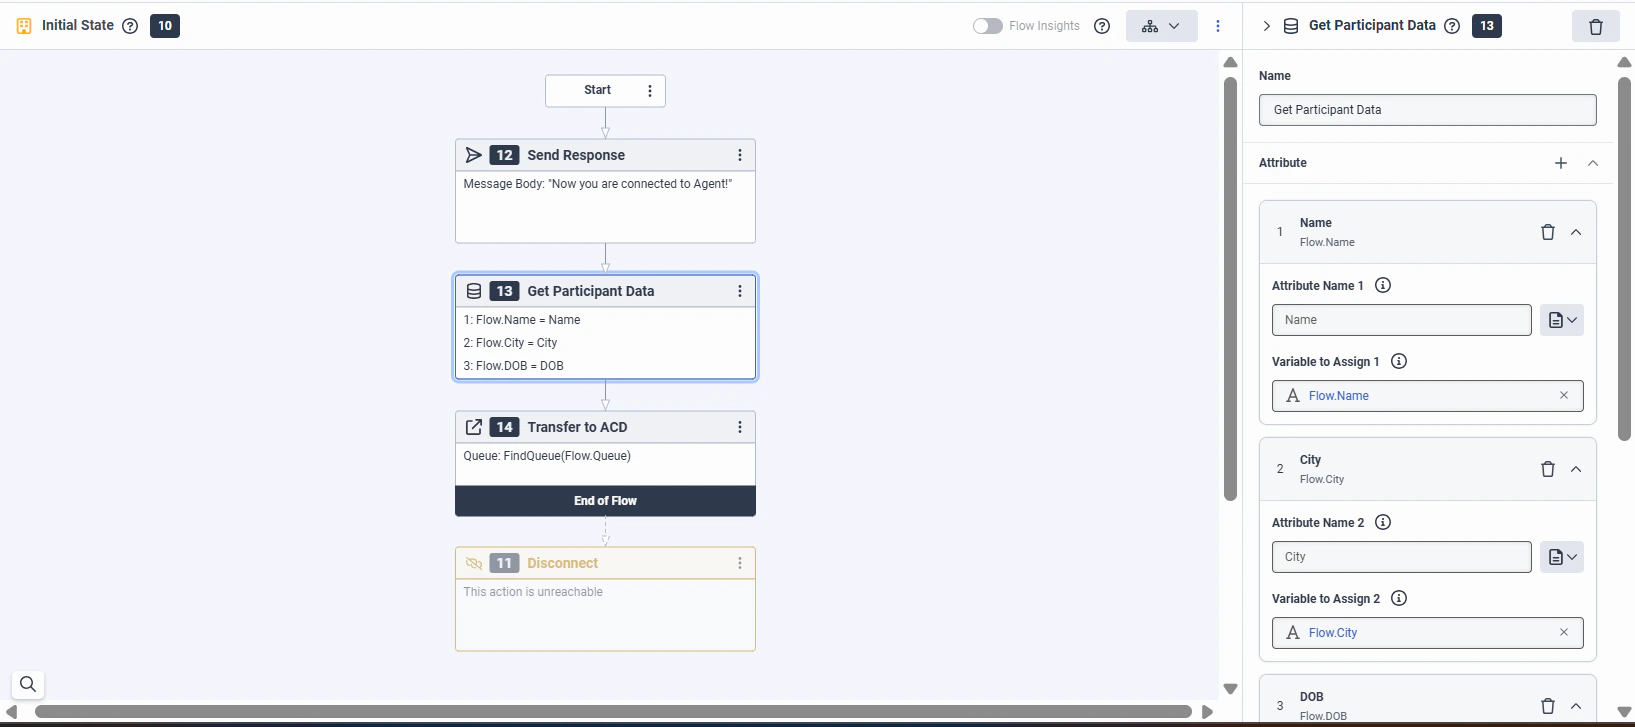
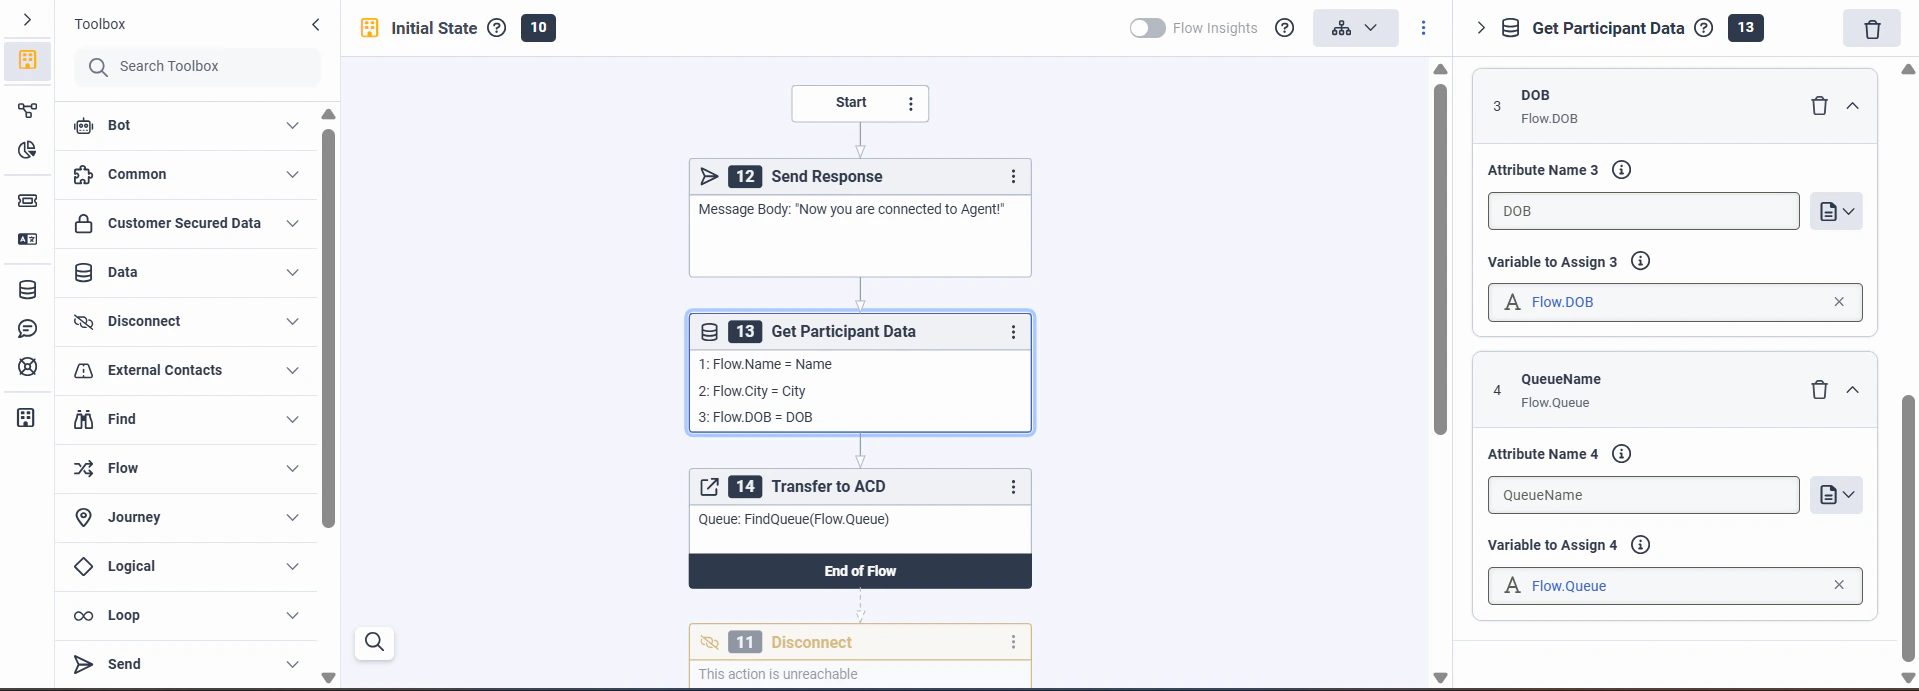
1. Add a **GetParticipantData** action before the **Transfer to ACD** node in the Architect Message Inbound flow.
2. Create flow variables and map the relevant metadata attributes.
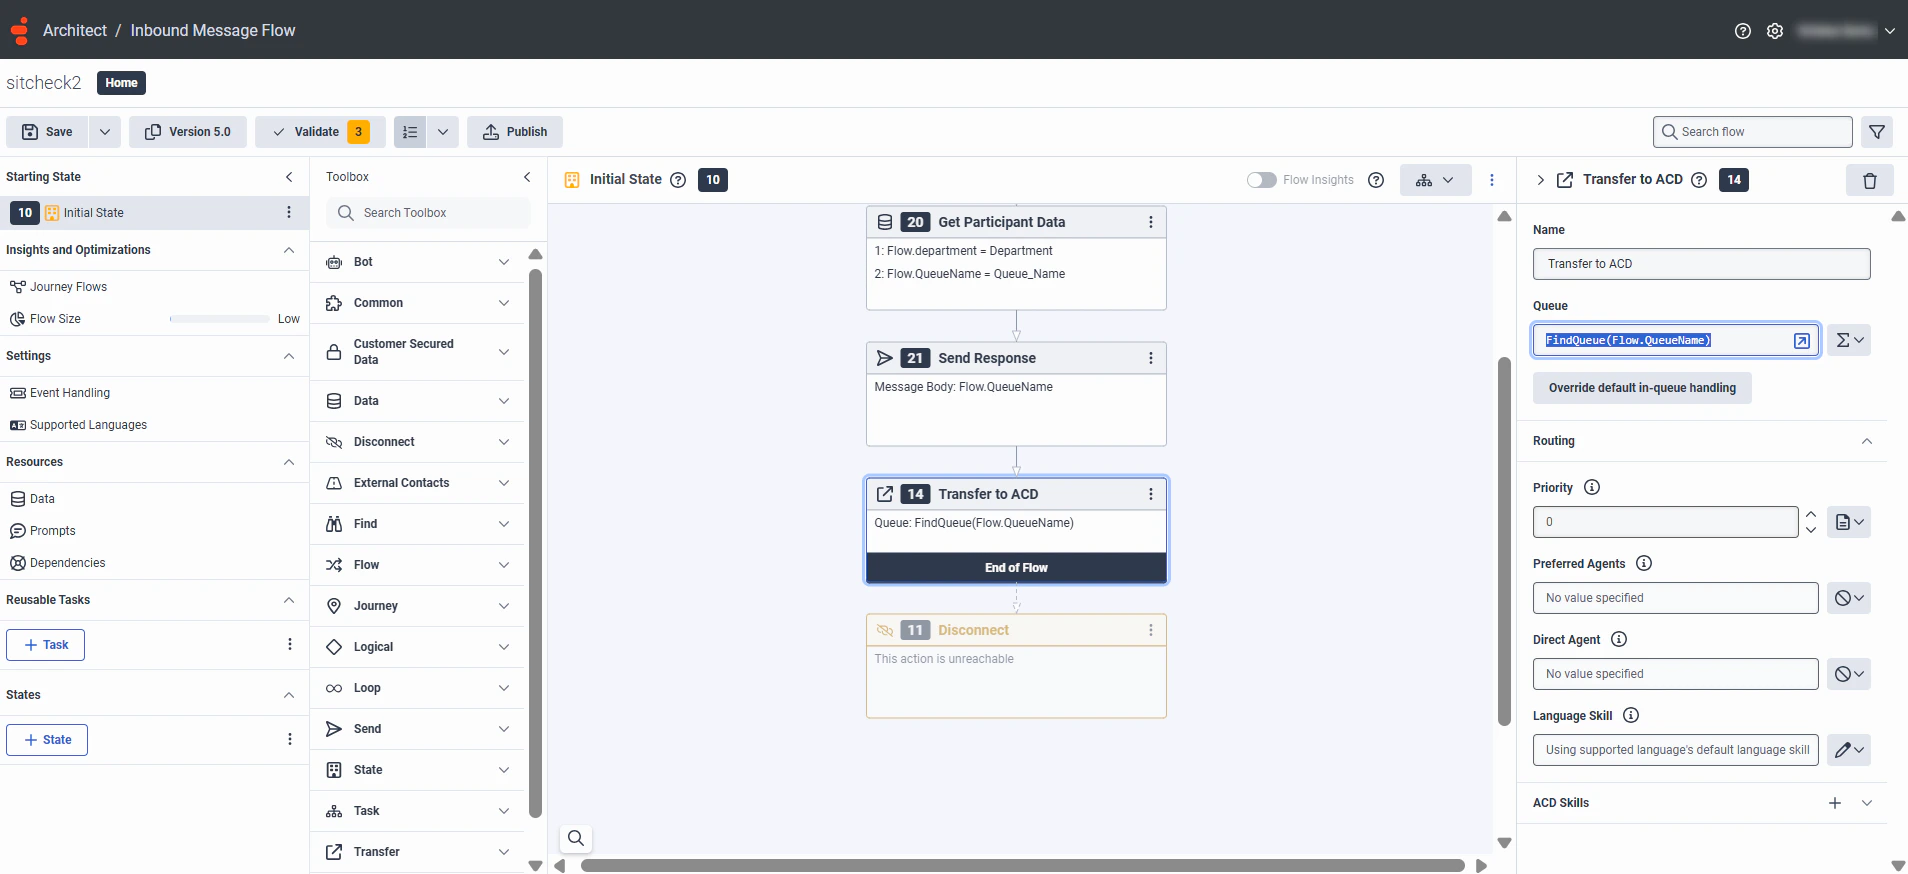
3. Reference those flow variables in the **Transfer to ACD** node.
To map metadata to flow variables before transferring to an agent:
1. Add a **GetParticipantData** action before the **Transfer to ACD** node in the Architect Message Inbound flow.
2. Create flow variables and map the relevant metadata attributes.
3. Reference those flow variables in the **Transfer to ACD** node.
 ### Dynamic Queue Handling
Dynamic queue handling routes interactions to the most appropriate queue at runtime based on conversation context and metadata (customer details, issue type, language, priority).
To enable dynamic queue handling:
1. Include `QueueName` in the metadata passed during the agent handoff. Set it dynamically based on your routing logic.
The queue name in the Entity node accepts underscores only when **Auto Correct** is turned off. Avoid underscores or disable Auto Correct in the Entity node.
2. In the Genesys Architect Inbound Message Flow, add a **Get Participant Data** action before the **Transfer to ACD** node to retrieve `QueueName` and assign it to a flow variable.
Ensure the `attributeName` matches the exact key used in the platform's metadata.
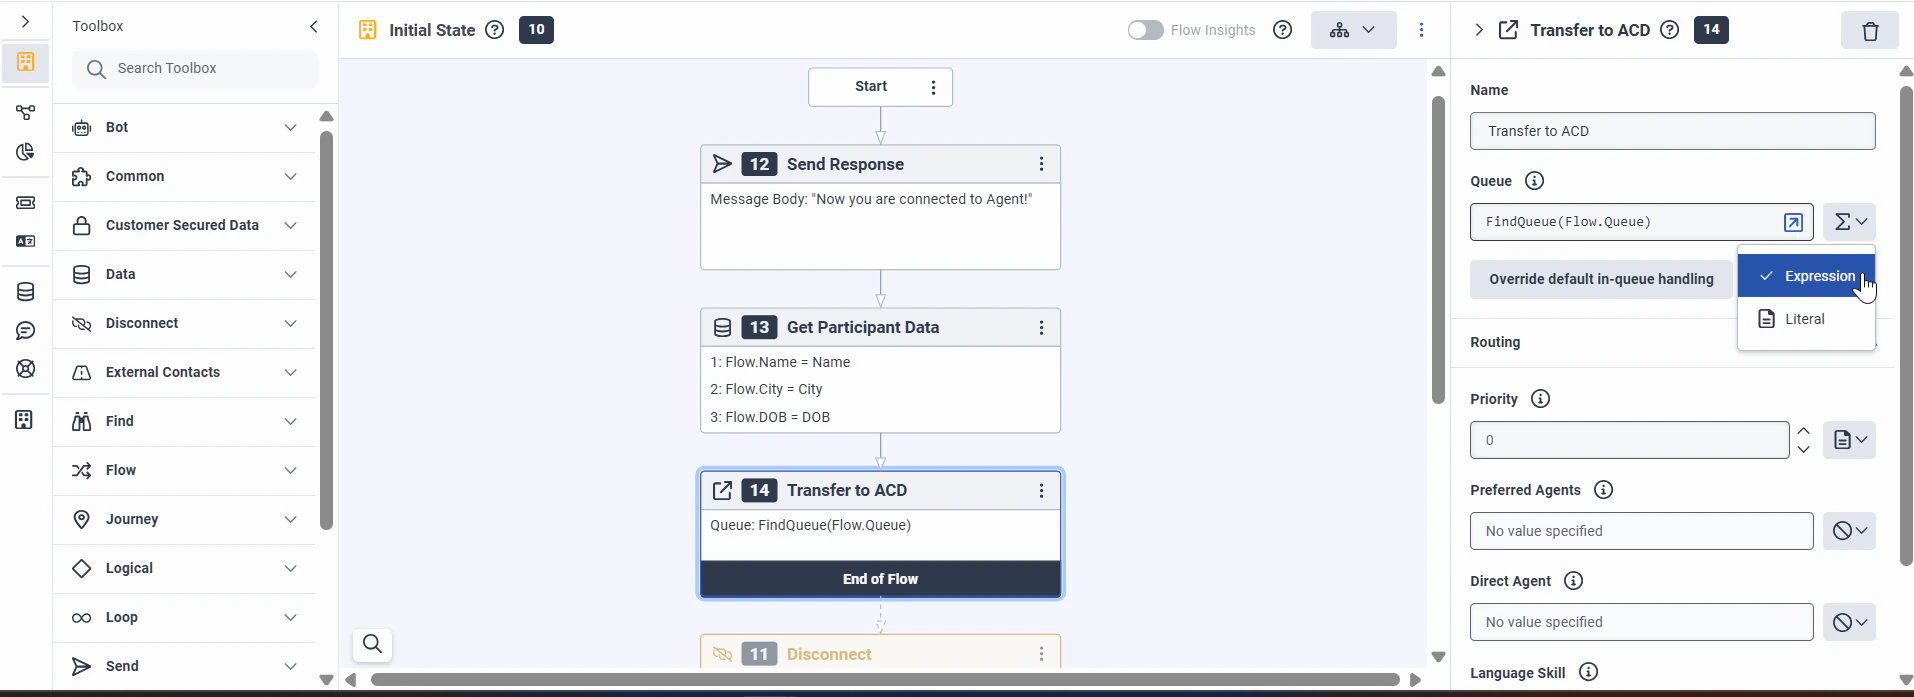
3. In the **Transfer to ACD** node, set the **Queue Name** field to **Expression** and use the `FindQueue()` function with the flow variable.
### Dynamic Queue Handling
Dynamic queue handling routes interactions to the most appropriate queue at runtime based on conversation context and metadata (customer details, issue type, language, priority).
To enable dynamic queue handling:
1. Include `QueueName` in the metadata passed during the agent handoff. Set it dynamically based on your routing logic.
The queue name in the Entity node accepts underscores only when **Auto Correct** is turned off. Avoid underscores or disable Auto Correct in the Entity node.
2. In the Genesys Architect Inbound Message Flow, add a **Get Participant Data** action before the **Transfer to ACD** node to retrieve `QueueName` and assign it to a flow variable.
Ensure the `attributeName` matches the exact key used in the platform's metadata.
3. In the **Transfer to ACD** node, set the **Queue Name** field to **Expression** and use the `FindQueue()` function with the flow variable.
 Built with [Mintlify](https://mintlify.com).