> ## Documentation Index
> Fetch the complete documentation index at: https://koreai-ai-for-process-dev.mintlify.app/llms.txt
> Use this file to discover all available pages before exploring further.
# Adding the Amazon Alexa Channel
[Back to Third-Party Voice](/ai-for-service/channels#voice-channelsy)
The platform supports the integration of AI Agent into the **Amazon Alexa** Channel. Ensure you have an Amazon Developer account for this configuration. Additionally, Amazon Alexa should be enabled for AI Agents built for voice-based channels.
To accomplish the channel enablement, you must do the following:
1. First, update the JSON file with the supported tasks from the Kore.ai XO Platform to the **Alexa Developer Portal**.
2. Next, configure the **Webhook URL** from the Kore.ai XO Platform as the **Service Endpoint** on the **Alexa Developer Portal** to receive messages.
## Important Checks and Considerations
The following are the important checks to do and considerations before you enable the Amazon Alexa channel:
1. Enterprise assistants that require the user’s authorization to communicate with it are not supported.
2. If your dialog tasks require the user’s authorization to communicate with external systems, then the Platform will push a card with URL information to the Alexa app.
3. Intents and entities of only Published Dialog Tasks can be exported to Amazon Alexa.
4. Ensure that your intents and entities adhere to the naming guidelines of Amazon Alexa.
5. Not all entity types available in the Kore.ai Platform are available in Alexa. Verify that your tasks contain Alexa-supported entities for optimal user experience.
6. Ensure that your dialog tasks contain one or more utterances.
7. To display responses as templates on supported devices like Echo Show, you must define channel-specific responses/prompts.
8. Ensure that your dialog tasks contain only the Message node as the last node. Alexa marks a task as completed if an AI Agent message is displayed without expecting input from the user.
9. Webhook Nodes work asynchronously and are currently not supported.
10. Amazon Alexa executes one task at a time, so the **Hold & Resume** functionality is not supported.
## Configuration Overview
The steps to add the **Amazon Alexa** channel are given below:
1. **Add a New Skill** - Create a new Alexa skill in the Amazon developer console.
2. **Configure the Interaction Model** - The Alexa skill can be built in one of the following ways:
* Dialog Migration to extract the dialog tasks from Kore.ai and import them into Amazon Alexa’s Skills. This will entail reimport for reflecting the ongoing changes in the dialog definition. Intent detection and execution are primarily controlled by Alexa.
* Redirection to create a single intent in your skill with the [SearchQuery](https://developer.amazon.com/en-US/docs/alexa/custom-skills/slot-type-reference.html#searchquery) Slot Type that accepts user inputs and redirects them to your Kore.ai assistant. Intent detection and execution are primarily controlled by the Kore.ai assistant.
3. **Enable Account Linking (Optional)** - To access end user’s authentication details to make API calls to external services.
4. **Enable Webhook Integration** - To integrate Amazon Alexa with your Kore.ai assistant, enable webhook integration by copying the **Webhook URL** on the **Configurations** tab of the Amazon Alexa Channel page in the XO Platform and select *HTTPS* as the Service Endpoint type.
5. **Enable Channel** - Enable the channel after completing the integration setup.
6. **Test Integration** - Once the channel is enabled, test any intent utterance using the Test tab of your Alexa Skill to validate a successful integration and check its responses for the given test utterances.
7. **Distribution, Privacy & Compliance, and Certification** - Publish your Alexa Skill on Alexa App and provide details for Privacy and Compliance to enable Skills Beta Testing, which allows you to invite your co-developers to test your app. You must also submit your Skill to Amazon for certification to enable your skill to become visible on Alexa Skills on Amazon App Store after it is certified.
## Step 1: Add a New Skill
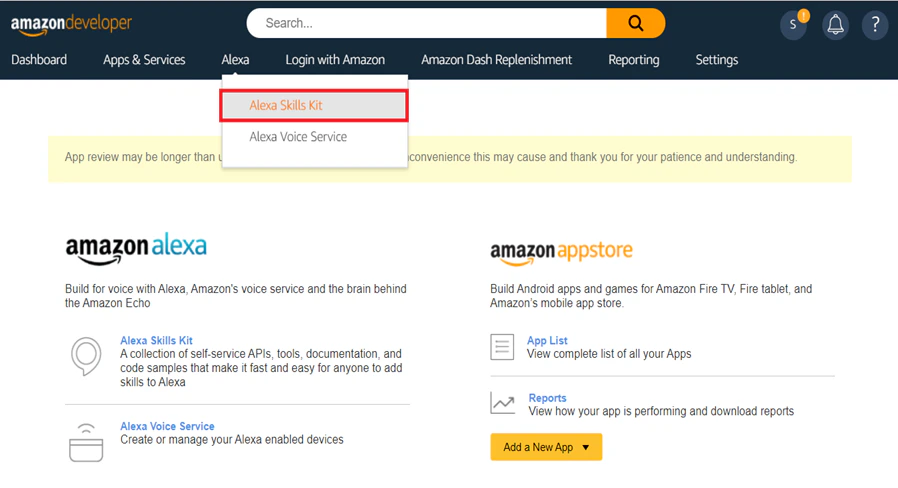
1. Log in to your [Amazon Developer Dashboard](https://developer.amazon.com/dashboard) and click the **Alexa** tab.
2. Select **Alexa Skills Kit** on the menu.
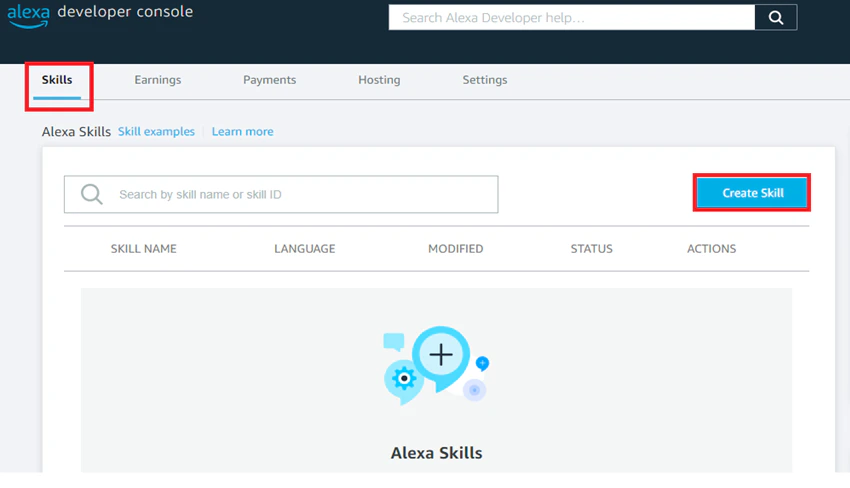
 3. Click the **Skills** tab on the **Alexa Developer Console**.
4. Click **Create Skill**.
3. Click the **Skills** tab on the **Alexa Developer Console**.
4. Click **Create Skill**.
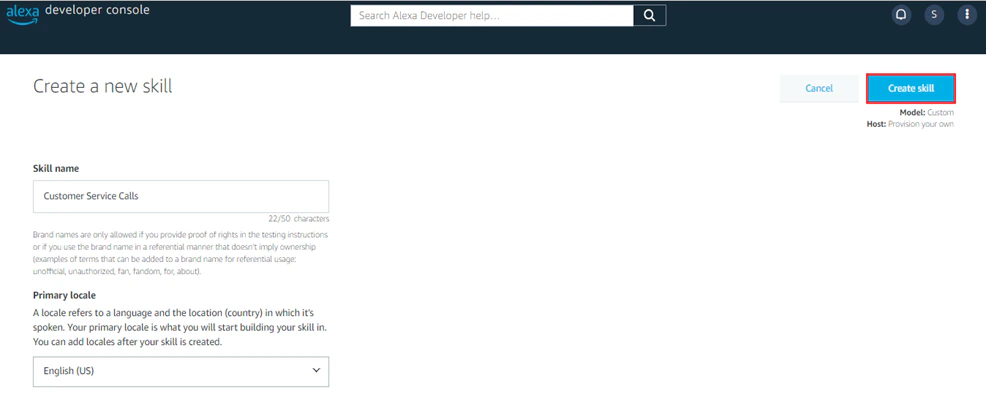
 5. Enter the **Skill Name** field information on the **Create a New Skill** page and select the **primary locale** value.
6. Then, follow the steps below:
* Enable the **Sync Locale** option, if required.
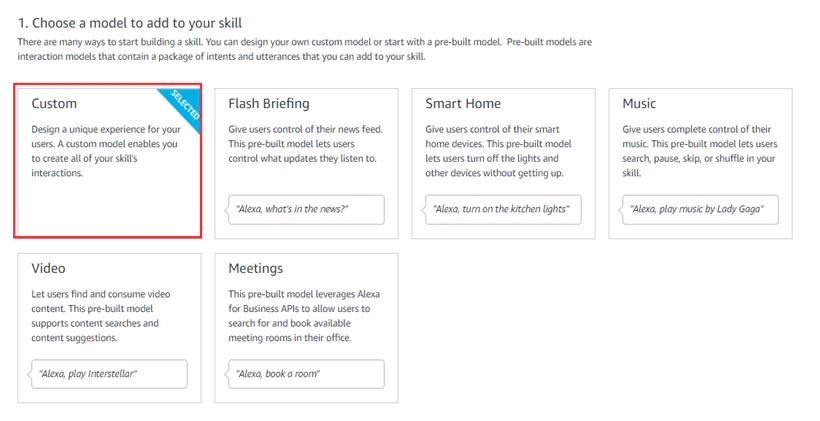
* Select **Custom** (default selection) to **Choose a model to add to your skill** to create all of your skill’s interactions and map them to your custom model.
5. Enter the **Skill Name** field information on the **Create a New Skill** page and select the **primary locale** value.
6. Then, follow the steps below:
* Enable the **Sync Locale** option, if required.
* Select **Custom** (default selection) to **Choose a model to add to your skill** to create all of your skill’s interactions and map them to your custom model.
 * Under **Choose a method to host your skill’s backend resources** section, select **Alexa-hosted(Node.js)**.
* Click **Create Skill**.
* Under **Choose a method to host your skill’s backend resources** section, select **Alexa-hosted(Node.js)**.
* Click **Create Skill**.
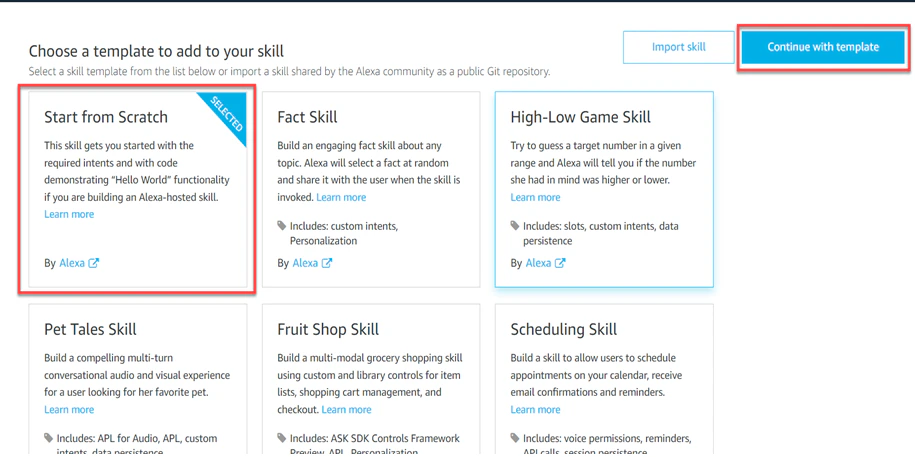
 * Select a template to add to your skill with these steps:
* Select the **Start from Scratch** tab.
* Click **Continue with Template**.
* Select a template to add to your skill with these steps:
* Select the **Start from Scratch** tab.
* Click **Continue with Template**.
 7. Enter the captcha shown on the screen and click **Submit** to process and create an Amazon Alexa voice skill. Your skill is built and listed on the Developer Console.
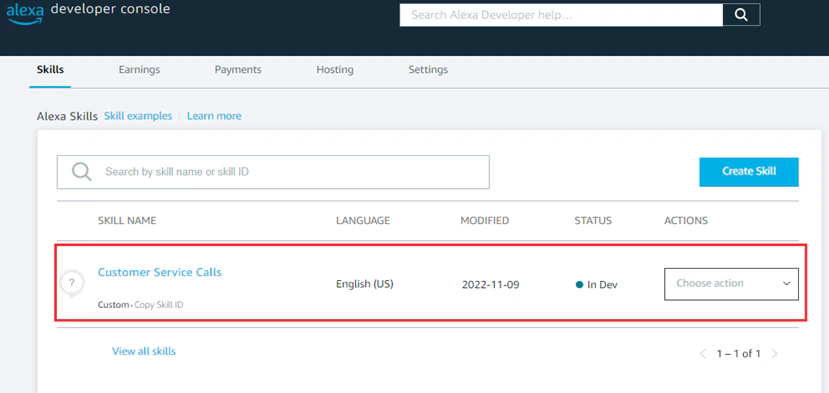
 8. Click **Your Skills** to view the custom skill you added to the console.
## Step 2: Configure the Interaction Model
Configuring the **Interaction Model** helps define the words and phrases in the user utterances on the Alexa channel to configure the AI Agent skill accordingly. An Interaction Model lets you add intents and annotations and check the **Intent History** and **Utterance Conflicts**. [Learn more](https://developer.amazon.com/en-US/docs/alexa/ask-overviews/voice-interaction-models.html#:~:text=Every%20Alexa%20skill%20has%20a,each%20skill%20type%20for%20you.).
### Dialog Migration to Extract the Dialog Tasks from Kore.ai
To configure a custom Interaction Model, follow the steps below:
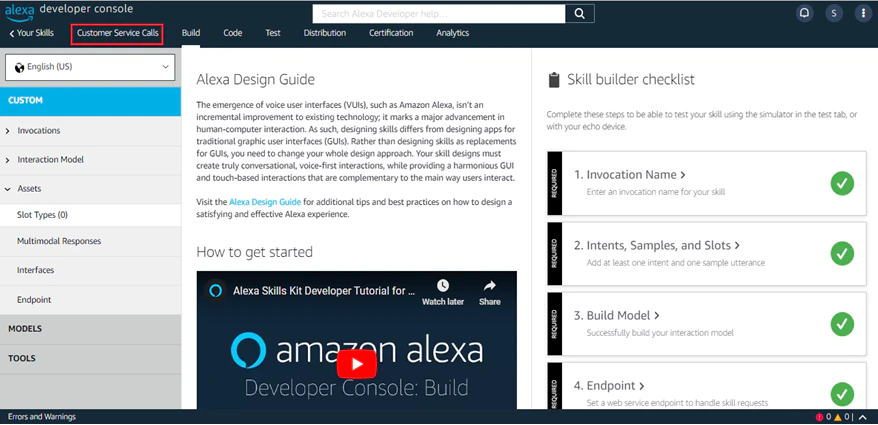
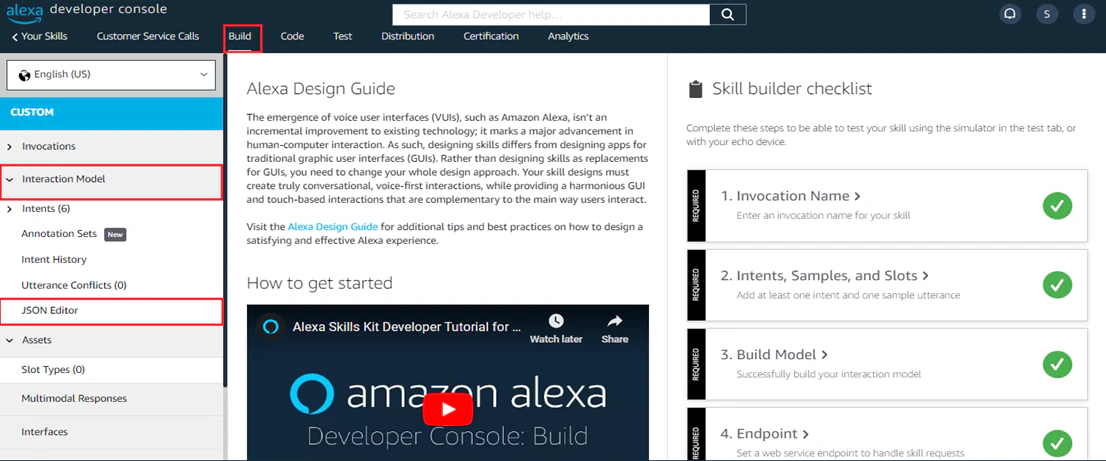
1. On the Developer Console, select the **Build** tab. Then, click the **Interaction Model** left menu option.
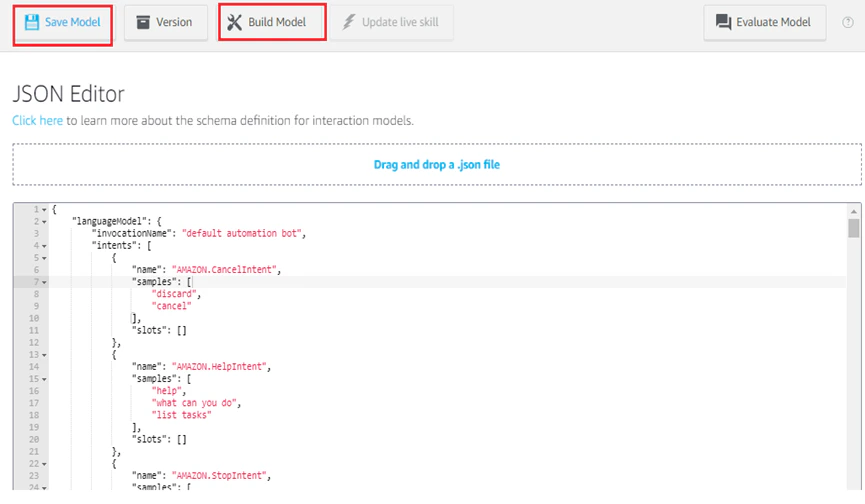
2. Select the **JSON Editor** option.
8. Click **Your Skills** to view the custom skill you added to the console.
## Step 2: Configure the Interaction Model
Configuring the **Interaction Model** helps define the words and phrases in the user utterances on the Alexa channel to configure the AI Agent skill accordingly. An Interaction Model lets you add intents and annotations and check the **Intent History** and **Utterance Conflicts**. [Learn more](https://developer.amazon.com/en-US/docs/alexa/ask-overviews/voice-interaction-models.html#:~:text=Every%20Alexa%20skill%20has%20a,each%20skill%20type%20for%20you.).
### Dialog Migration to Extract the Dialog Tasks from Kore.ai
To configure a custom Interaction Model, follow the steps below:
1. On the Developer Console, select the **Build** tab. Then, click the **Interaction Model** left menu option.
2. Select the **JSON Editor** option.
 3. In the **JSON Editor** window, define the intents and entities to associate with your newly created skill based on the Kore.ai XO Platform definitions.
4. To capture the intents and entities from the Kore.ai XO Builder, follow these steps:
* Select the AI Agent.
* Navigate to **Channels & Flows** > **Channels** > **Third Party Voice** > **All** >
**Amazon Alexa** > **Configurations**.
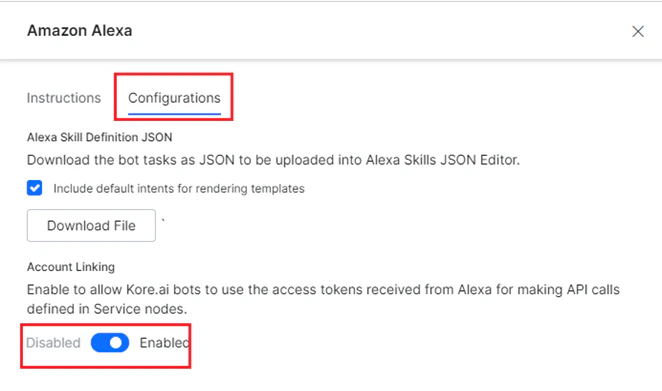
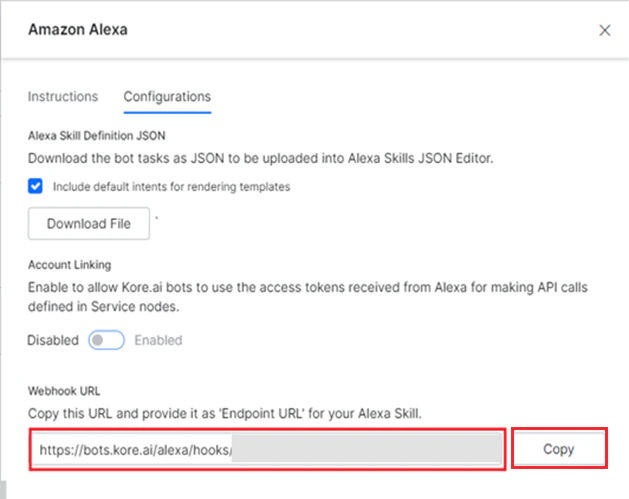
* Click **Download File** under **Alexa Skill Definition JSON** to download the AI Agent’s tasks.
3. In the **JSON Editor** window, define the intents and entities to associate with your newly created skill based on the Kore.ai XO Platform definitions.
4. To capture the intents and entities from the Kore.ai XO Builder, follow these steps:
* Select the AI Agent.
* Navigate to **Channels & Flows** > **Channels** > **Third Party Voice** > **All** >
**Amazon Alexa** > **Configurations**.
* Click **Download File** under **Alexa Skill Definition JSON** to download the AI Agent’s tasks.
 * Click **Confirm** on the **Download** window.
* Click **Drag and drop a *.json* file** on the **JSON Editor** of the Alexa Developer Console and upload the file.
* Click **Confirm** on the **Download** window.
* Click **Drag and drop a *.json* file** on the **JSON Editor** of the Alexa Developer Console and upload the file.
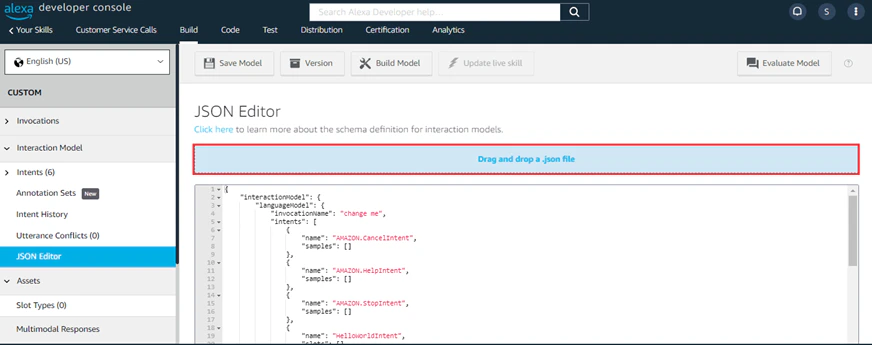 * The JSON Editor gets updated with the information in the uploaded file.
* Click **Evaluate Model** to review and ensure that there are no errors.
* Click **Save Model**, then click **Build Model**.
* The JSON Editor gets updated with the information in the uploaded file.
* Click **Evaluate Model** to review and ensure that there are no errors.
* Click **Save Model**, then click **Build Model**.
 It takes 2-5 mins for the Model to build. Any changes to the built model can be implemented by rebuilding the model.
### Create a Single Intent with the SearchQuery Slot Type
The `AMAZON.SearchQuery` slot type helps capture less-predictable user utterances in the search query for an intent name. Once you configure the ***SearchQuery*** Slot Type, the Alexa Channel redirects the utterances to your Kore.ai Assistant for intent detection.
Please ensure that your skill uses at most one `AMAZON.SearchQuery` slot per intent. The `Amazon.SearchQuery` slot type cannot be combined with another intent slot in sample utterances.
To configure a custom Interaction Model for the **SearchQuery** Slot Type, follow the steps below:
1. Follow the sequence in Step 4 of [Dialog Migration to Extract the Dialog Tasks from Kore.ai](#dialog-migration-to-extract-the-dialog-tasks-from-koreai).
2. Create a new custom intent by following these [steps](#dialog-migration-to-extract-the-dialog-tasks-from-koreai).
3. After writing a few utterances, pick the words or phrases representing variable information as the intent’s slots; For example, “*I would like to order two iPhones*.”
4. Create a slot for each word or phrase and replace the original word with the slot name in curly brackets **({ })**.
5. To create a slot, follow the steps below:
* Sign in to the [Alexa Developer Console](https://developer.amazon.com/alexa/console/ask).
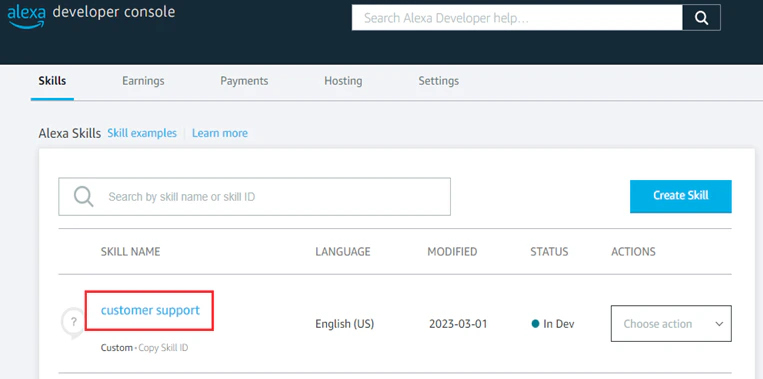
* Click the **Skills** tab.
* In the **SKILL NAME** column, click the name of your custom skill.
It takes 2-5 mins for the Model to build. Any changes to the built model can be implemented by rebuilding the model.
### Create a Single Intent with the SearchQuery Slot Type
The `AMAZON.SearchQuery` slot type helps capture less-predictable user utterances in the search query for an intent name. Once you configure the ***SearchQuery*** Slot Type, the Alexa Channel redirects the utterances to your Kore.ai Assistant for intent detection.
Please ensure that your skill uses at most one `AMAZON.SearchQuery` slot per intent. The `Amazon.SearchQuery` slot type cannot be combined with another intent slot in sample utterances.
To configure a custom Interaction Model for the **SearchQuery** Slot Type, follow the steps below:
1. Follow the sequence in Step 4 of [Dialog Migration to Extract the Dialog Tasks from Kore.ai](#dialog-migration-to-extract-the-dialog-tasks-from-koreai).
2. Create a new custom intent by following these [steps](#dialog-migration-to-extract-the-dialog-tasks-from-koreai).
3. After writing a few utterances, pick the words or phrases representing variable information as the intent’s slots; For example, “*I would like to order two iPhones*.”
4. Create a slot for each word or phrase and replace the original word with the slot name in curly brackets **({ })**.
5. To create a slot, follow the steps below:
* Sign in to the [Alexa Developer Console](https://developer.amazon.com/alexa/console/ask).
* Click the **Skills** tab.
* In the **SKILL NAME** column, click the name of your custom skill.
 * From the left menu, click **Custom** > **Interaction Model** > **Intents**.
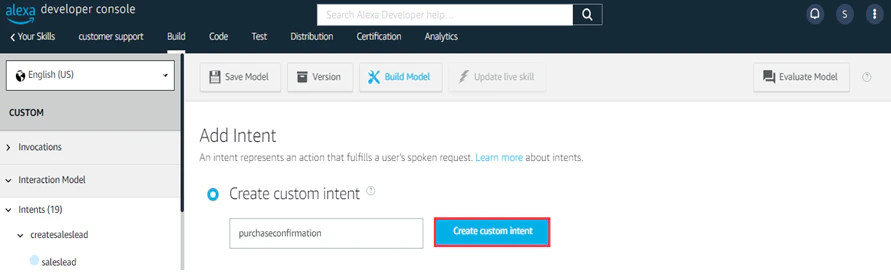
* Click **+Add Intent** to create a custom intent.
* Type a *Custom Intent Name* and click **Create custom Intent**.
* From the left menu, click **Custom** > **Interaction Model** > **Intents**.
* Click **+Add Intent** to create a custom intent.
* Type a *Custom Intent Name* and click **Create custom Intent**.
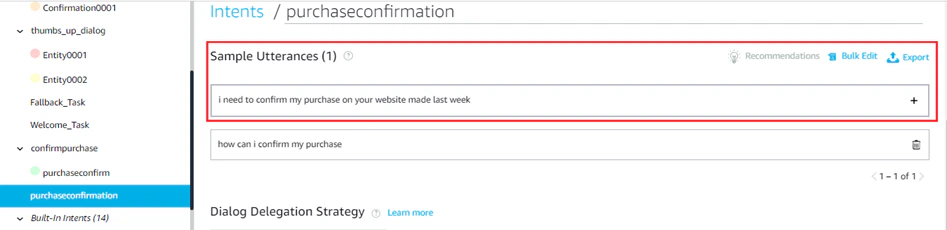
 * Click this intent name listed on the left menu under **Intents** to open the detail page.
* Add the phrases or words in the **Sample Utterances** text input field.
* Click this intent name listed on the left menu under **Intents** to open the detail page.
* Add the phrases or words in the **Sample Utterances** text input field.
 * In the drop-down box, enter the slot name and click the **+** icon.
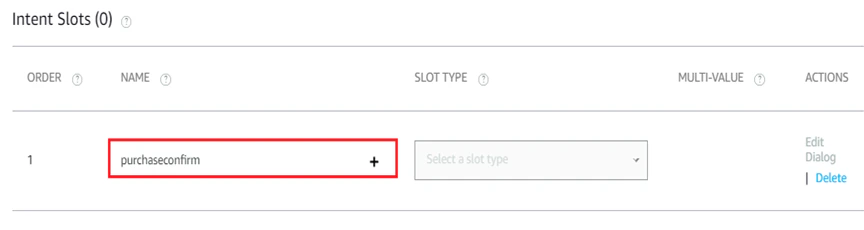 * Repeat these steps for all the remaining variable words.
1. Select `AMAZON.SearchQuery` from the dropdown list in the **SLOT TYPE** column.
* Repeat these steps for all the remaining variable words.
1. Select `AMAZON.SearchQuery` from the dropdown list in the **SLOT TYPE** column.
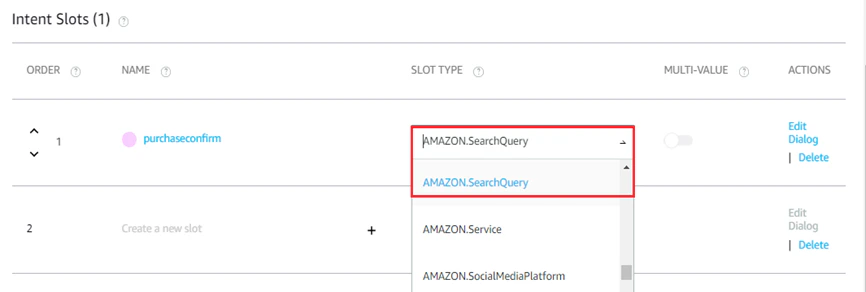 2. Click **Save Model** and **Build Model** on the top action panel.
On the **Intents** detail page, the **Intent Slots** section displays the slots you add. When you highlight a word or phrase in an utterance, you can add a new slot or select an existing slot.
## Step 3: Enable Account Linking (Optional)
If end-user authorization is required for making API calls to external services, you need to enable the **Account Linking** feature for your Alexa Skill with the steps below:
1. On **Your Skills** console, select the **Build** tab.
2. Expand the **Tools** left menu, then click **Account Linking**.
3. **Auth Code Grant** is the default *Authorization grant type* selection on the **Account Linking** page.Enter the values for the mandatory fields under **Security Provider Information**. [Learn more](https://developer.amazon.com/en-US/docs/alexa/account-linking/configure-implicit-grant.html#config).
4. Click **Save** to configure the **Implicit Grant** flow for Account Linking.
2. Click **Save Model** and **Build Model** on the top action panel.
On the **Intents** detail page, the **Intent Slots** section displays the slots you add. When you highlight a word or phrase in an utterance, you can add a new slot or select an existing slot.
## Step 3: Enable Account Linking (Optional)
If end-user authorization is required for making API calls to external services, you need to enable the **Account Linking** feature for your Alexa Skill with the steps below:
1. On **Your Skills** console, select the **Build** tab.
2. Expand the **Tools** left menu, then click **Account Linking**.
3. **Auth Code Grant** is the default *Authorization grant type* selection on the **Account Linking** page.Enter the values for the mandatory fields under **Security Provider Information**. [Learn more](https://developer.amazon.com/en-US/docs/alexa/account-linking/configure-implicit-grant.html#config).
4. Click **Save** to configure the **Implicit Grant** flow for Account Linking.
 Alexa shares the user **access tokens** with Kore.ai assistants to make API calls defined for the Service nodes.
Please enable **Account Linking** on the Kore.ai Platform under **Configurations** in the **Amazon Alexa** window. This allows Kore.ai assistants to use the access tokens from Alexa to make API calls defined in the Service nodes.
Alexa shares the user **access tokens** with Kore.ai assistants to make API calls defined for the Service nodes.
Please enable **Account Linking** on the Kore.ai Platform under **Configurations** in the **Amazon Alexa** window. This allows Kore.ai assistants to use the access tokens from Alexa to make API calls defined in the Service nodes.
 ## Step 4: Enable the Webhook Integration
1. On the **Alexa Developer Console**, click the **Build** tab on the top panel.
2. Click the **Endpoint** left menu option.
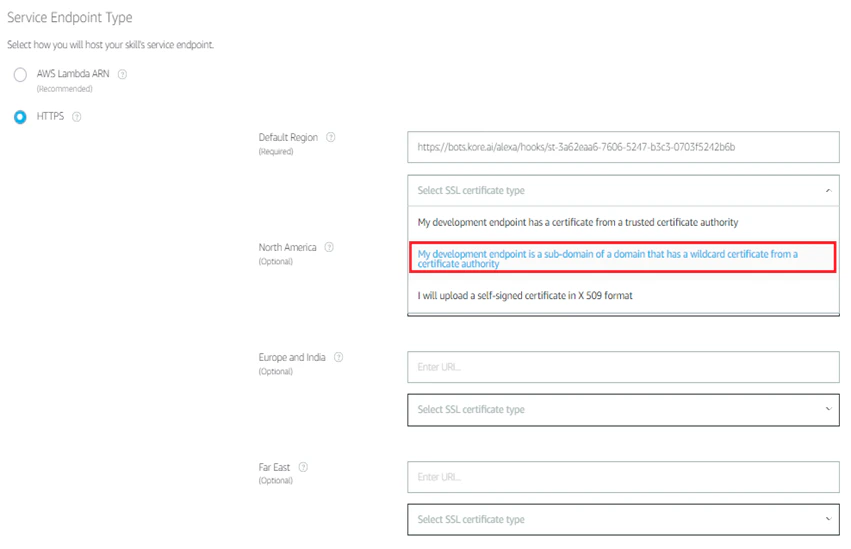
3. Select **HTTPS** as the **Service Endpoint Type**.
## Step 4: Enable the Webhook Integration
1. On the **Alexa Developer Console**, click the **Build** tab on the top panel.
2. Click the **Endpoint** left menu option.
3. Select **HTTPS** as the **Service Endpoint Type**.
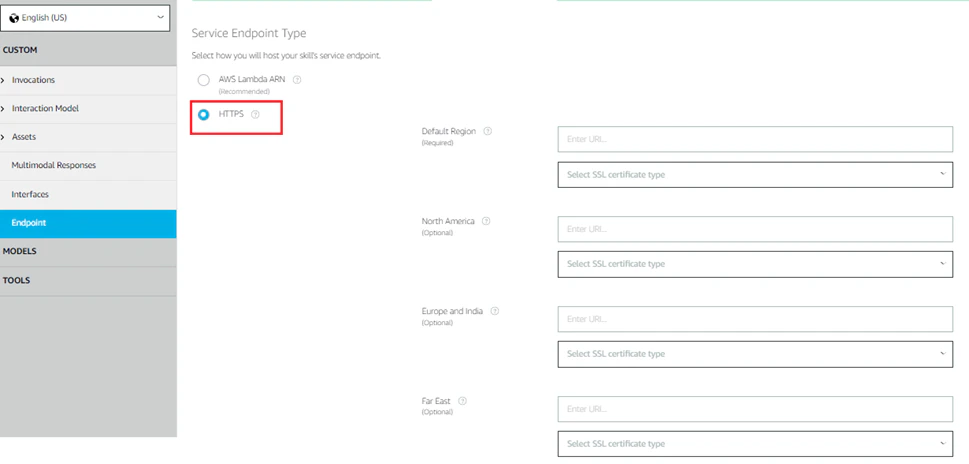 4. On the Kore.ai XO Platform, copy the **Webhook URL** available under **Configurations** on the **Amazon Alexa** Channel window.
5. Paste the URL for the **Default Region** field on the **Service Endpoint Type** page.
4. On the Kore.ai XO Platform, copy the **Webhook URL** available under **Configurations** on the **Amazon Alexa** Channel window.
5. Paste the URL for the **Default Region** field on the **Service Endpoint Type** page.
 6. For the **Select SSL Certificate Type** drop-down, select the option “***My development endpoint is a sub-domain of a domain that has a wildcard certificate from a certificate authority***.”
 7. Click the **Save Endpoint** button on the top panel.
The *webhook/callback URL* is configured successfully to receive messages and events.
## Step 5: Enable the Channel
Before testing your assistant on **Alexa**, complete the channel setup with these steps:
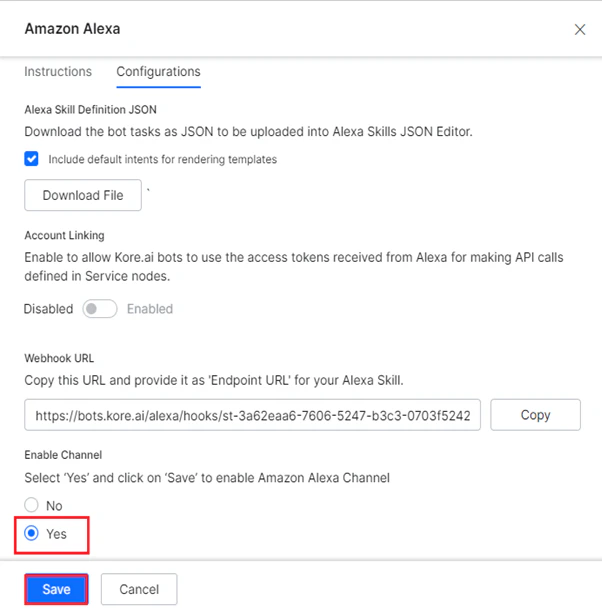
1. Click the **Configurations** in the Amazon Alexa window on the Kore.ai XO Platform.
2. Select **Yes** for **Enable Channel**.
3. Click **Save** to complete the configuration.
7. Click the **Save Endpoint** button on the top panel.
The *webhook/callback URL* is configured successfully to receive messages and events.
## Step 5: Enable the Channel
Before testing your assistant on **Alexa**, complete the channel setup with these steps:
1. Click the **Configurations** in the Amazon Alexa window on the Kore.ai XO Platform.
2. Select **Yes** for **Enable Channel**.
3. Click **Save** to complete the configuration.
 ## Step 6: Test the Integration
Once done, test the utterance integration on the **Alexa Developer Console** using the steps below:
1. Click the **Test** tab.
2. Select **Development** for the **Skill testing is enabled in** option.
## Step 6: Test the Integration
Once done, test the utterance integration on the **Alexa Developer Console** using the steps below:
1. Click the **Test** tab.
2. Select **Development** for the **Skill testing is enabled in** option.
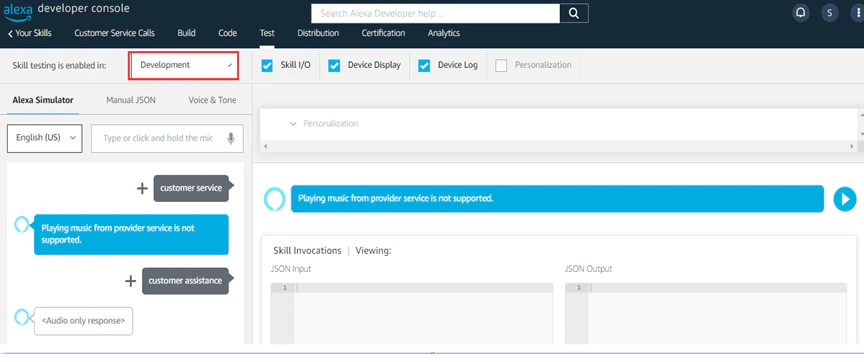 3. Navigate to the **Alexa Simulator** section, type an intent utterance, and click enter.
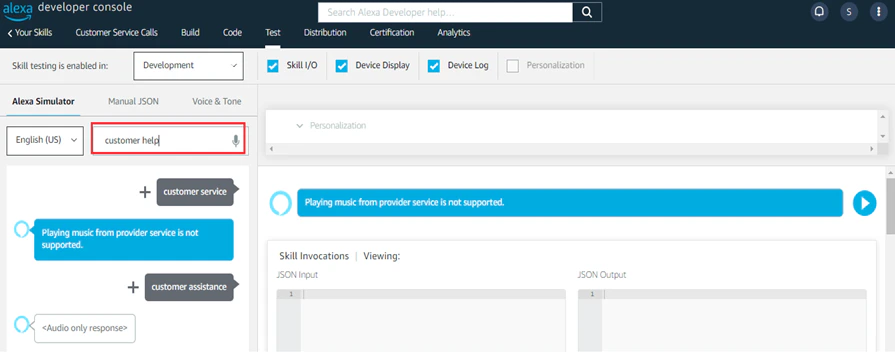 If you get a successful response, then the integration is considered a success.
## Step 7: Distribution
To publish your Alexa Skill on the **Alexa App**, follow the steps below:
1. Click the **Distribution** tab on the **Alexa Developer Console**.
2. Click **Skill Preview**.
If you get a successful response, then the integration is considered a success.
## Step 7: Distribution
To publish your Alexa Skill on the **Alexa App**, follow the steps below:
1. Click the **Distribution** tab on the **Alexa Developer Console**.
2. Click **Skill Preview**.
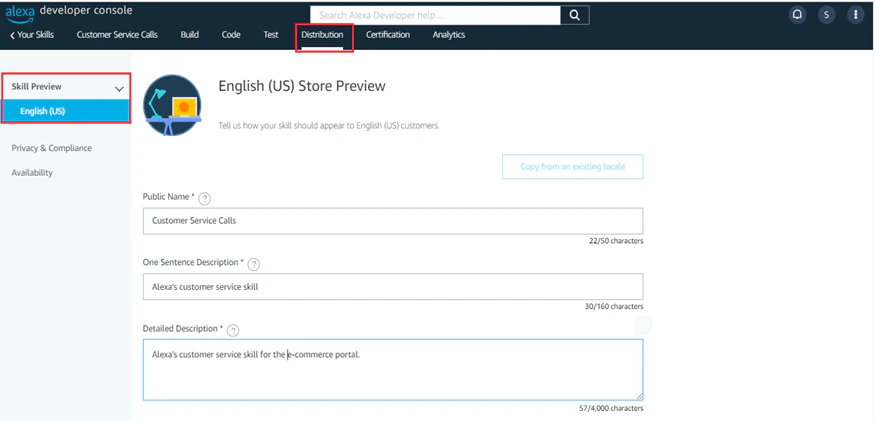 3. Enter the values for the required fields.
4. Click **Save and Continue**.
### Privacy & Compliance
On Alexa, it’s important to set up your Privacy and Compliance information before building the model. To update **Privacy and Compliance** information, follow these steps:
1. Click the **Distribution** tab. Then, click the **Privacy & Compliance** left menu option.
3. Enter the values for the required fields.
4. Click **Save and Continue**.
### Privacy & Compliance
On Alexa, it’s important to set up your Privacy and Compliance information before building the model. To update **Privacy and Compliance** information, follow these steps:
1. Click the **Distribution** tab. Then, click the **Privacy & Compliance** left menu option.
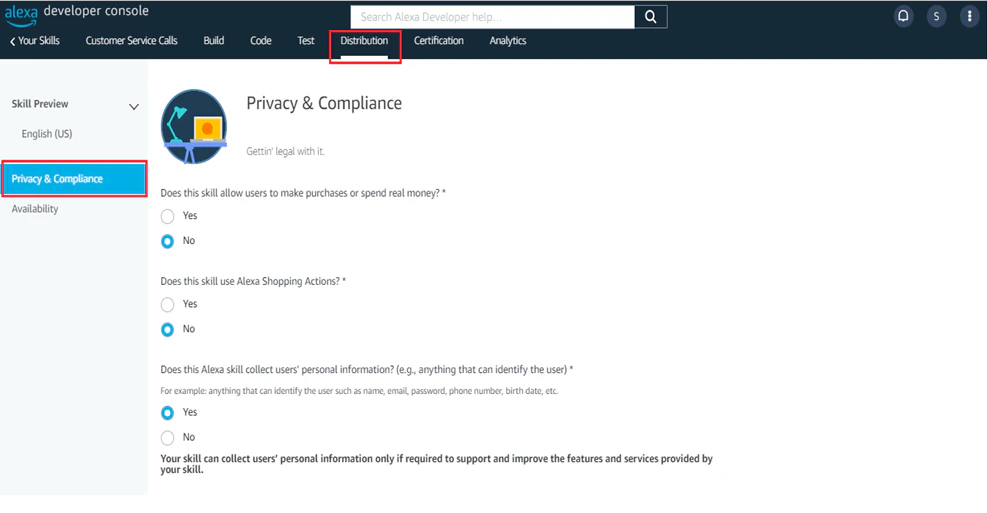 2. Provide all the required details.
3. Click **Save and Continue**.
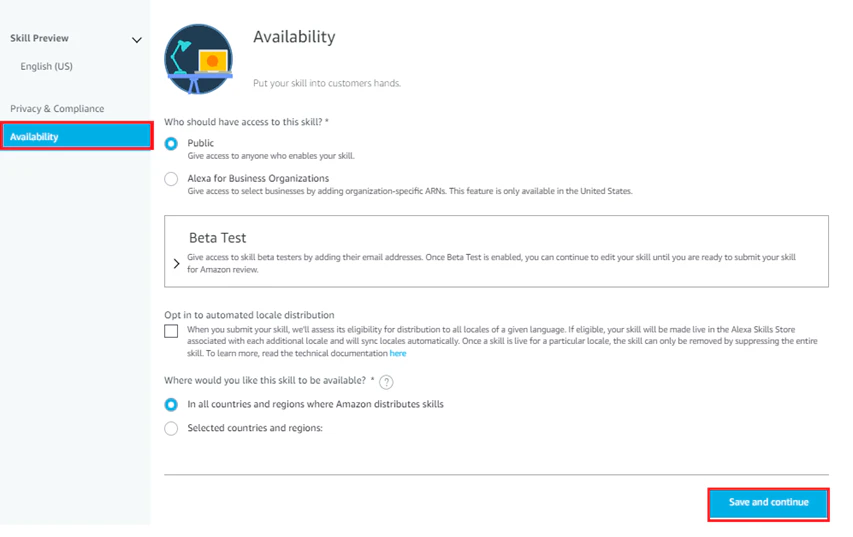
### Availability
You will be redirected to the **Availability** page to invite your co-developers to test your app. To complete the invitation, follow the steps below:
1. Enable the **Beta Test** option if it’s disabled.
2. Enter the required details.
3. Click **Save and Continue**.
2. Provide all the required details.
3. Click **Save and Continue**.
### Availability
You will be redirected to the **Availability** page to invite your co-developers to test your app. To complete the invitation, follow the steps below:
1. Enable the **Beta Test** option if it’s disabled.
2. Enter the required details.
3. Click **Save and Continue**.
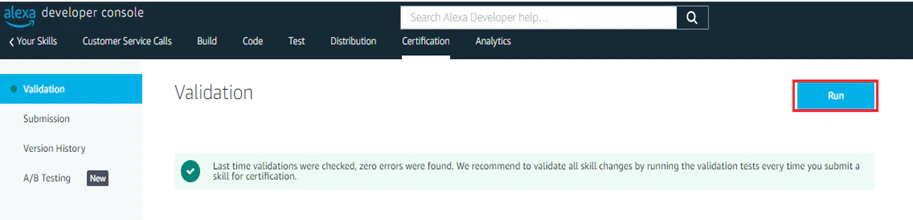
 ### Validation
The next step is to **validate your skills** for the model. After configuring **Availability**, you will be redirected to the **Validation** page under the **Certification** section. Here, follow these steps:
1. Review and complete any required fixes based on the details displayed for the issue.
2. Click **Run** to validate your skill.
### Validation
The next step is to **validate your skills** for the model. After configuring **Availability**, you will be redirected to the **Validation** page under the **Certification** section. Here, follow these steps:
1. Review and complete any required fixes based on the details displayed for the issue.
2. Click **Run** to validate your skill.
 3. Upon successful validation, your skill will be visible under **Alexa Skills** on Amazon App Store.
 4. Additionally, your **Skill Builder Checklist** will display green checks for all the options.
 5. After enabling the channel and verifying all the configurations, you can test the new channel integration by [Publishing your App](/ai-for-service/deployment/publishing-app).
Built with [Mintlify](https://mintlify.com).
5. After enabling the channel and verifying all the configurations, you can test the new channel integration by [Publishing your App](/ai-for-service/deployment/publishing-app).
Built with [Mintlify](https://mintlify.com).