> ## Documentation Index
> Fetch the complete documentation index at: https://koreai-ai-for-process-dev.mintlify.app/llms.txt
> Use this file to discover all available pages before exploring further.
# Agent AI Playbook
Playbooks give contact center agents structured, step-by-step guidance for handling customer interactions. Supervisors create and manage playbooks to help agents maintain consistent quality, even during high call volumes or complex situations.
***
## Playbook Types
| Type | Description |
| ----------- | -------------------------------------------------------------------------------------------------------------------------------------------------------------------- |
| **Primary** | Standard playbooks triggered for all assigned agents. Include Open and Close stages with multiple configurable steps. Always visible on the Agent AI widget. |
| **Dynamic** | Situation-specific playbooks triggered by a customer utterance or dialog execution. A lightbulb icon on the widget alerts the agent when a Dynamic Playbook matches. |
***
## Create a Playbook
### Create a Primary Playbook
1. Sign in to the XO Platform.
2. Select **AgentAI** > **EXPERIENCE** > **Agent Playbook**.
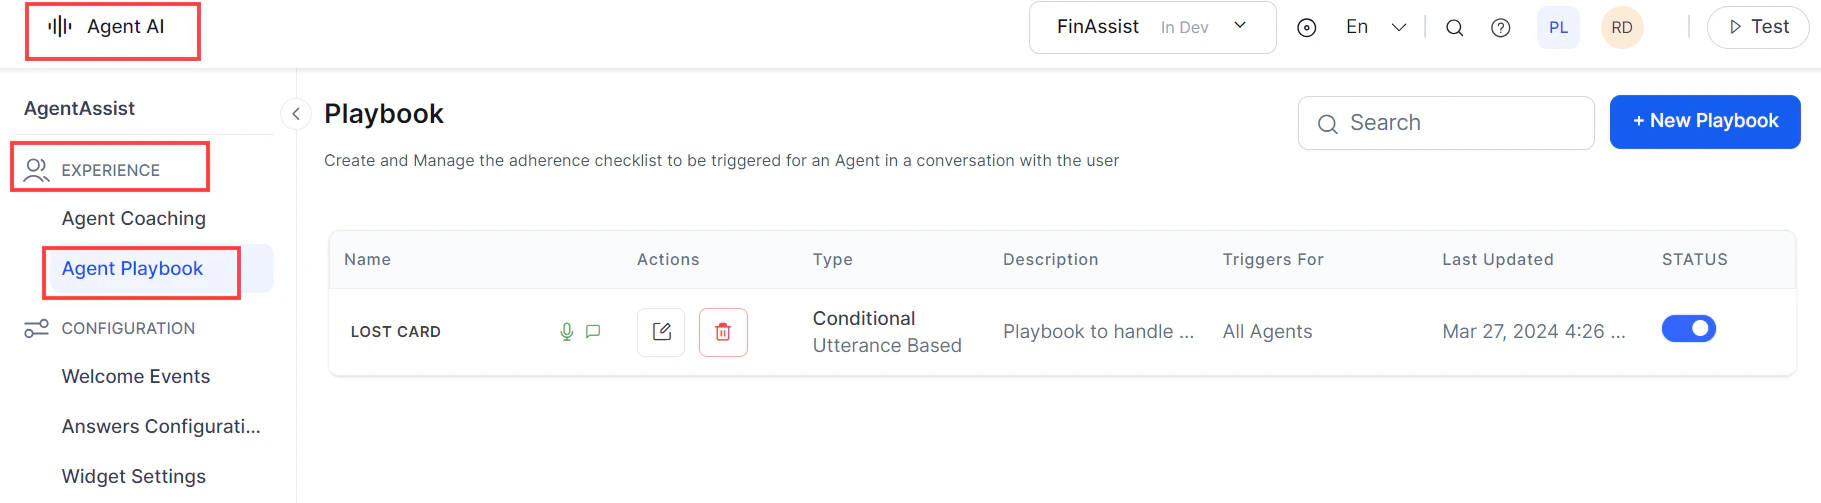 3. Select **+ New Playbook**.
4. Fill in the **General Settings**:
| Field | Description |
| -------------------- | ------------------------------------------------------------------------------------------------------- |
| **Playbook Name** | A name that reflects the playbook's purpose. |
| **Description** | A short description of what the playbook covers. |
| **Type** | Select **Primary** (selected by default). |
| **Tags** | Labels for grouping and searching similar playbooks. Press **Enter** after each tag. |
| **Step Progression** | **Sequential** — steps must be completed in order. **Random** — agents can complete steps in any order. |
| **Channels** | Voice or Chat. |
5. Select **Save**. The playbook is created with two default stages (Open and Close) and sample steps.
3. Select **+ New Playbook**.
4. Fill in the **General Settings**:
| Field | Description |
| -------------------- | ------------------------------------------------------------------------------------------------------- |
| **Playbook Name** | A name that reflects the playbook's purpose. |
| **Description** | A short description of what the playbook covers. |
| **Type** | Select **Primary** (selected by default). |
| **Tags** | Labels for grouping and searching similar playbooks. Press **Enter** after each tag. |
| **Step Progression** | **Sequential** — steps must be completed in order. **Random** — agents can complete steps in any order. |
| **Channels** | Voice or Chat. |
5. Select **Save**. The playbook is created with two default stages (Open and Close) and sample steps.
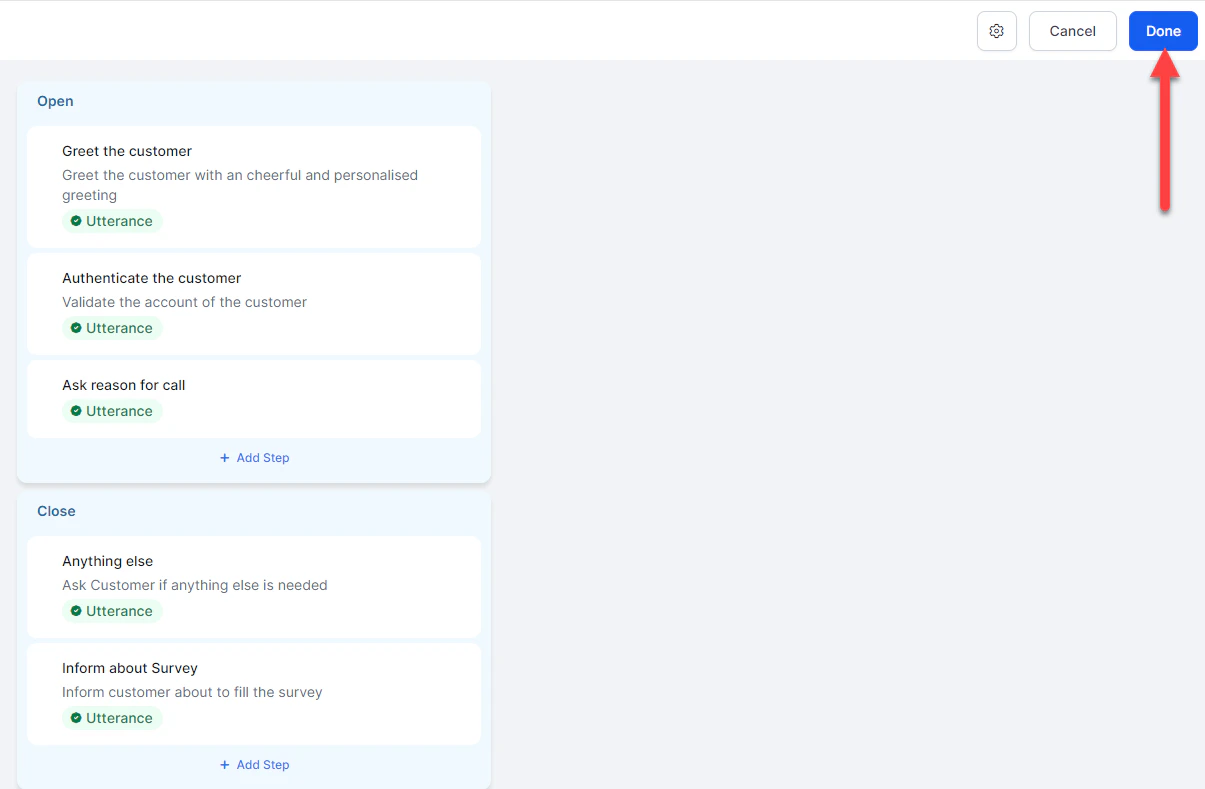 6. Select **Done**.
***
### Create a Dynamic Playbook
1. Sign in to the XO Platform.
2. Select **Configuration** > **Playbook**.
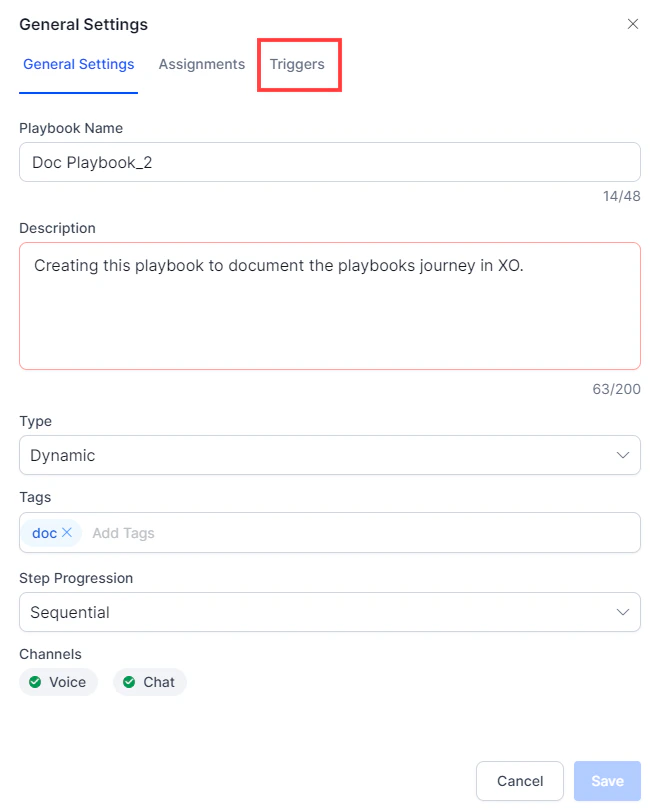
3. Follow steps 3-4 from [Create a Primary Playbook](#create-a-primary-playbook), but select **Dynamic** in the **Type** field. A **Triggers** menu appears.
6. Select **Done**.
***
### Create a Dynamic Playbook
1. Sign in to the XO Platform.
2. Select **Configuration** > **Playbook**.
3. Follow steps 3-4 from [Create a Primary Playbook](#create-a-primary-playbook), but select **Dynamic** in the **Type** field. A **Triggers** menu appears.
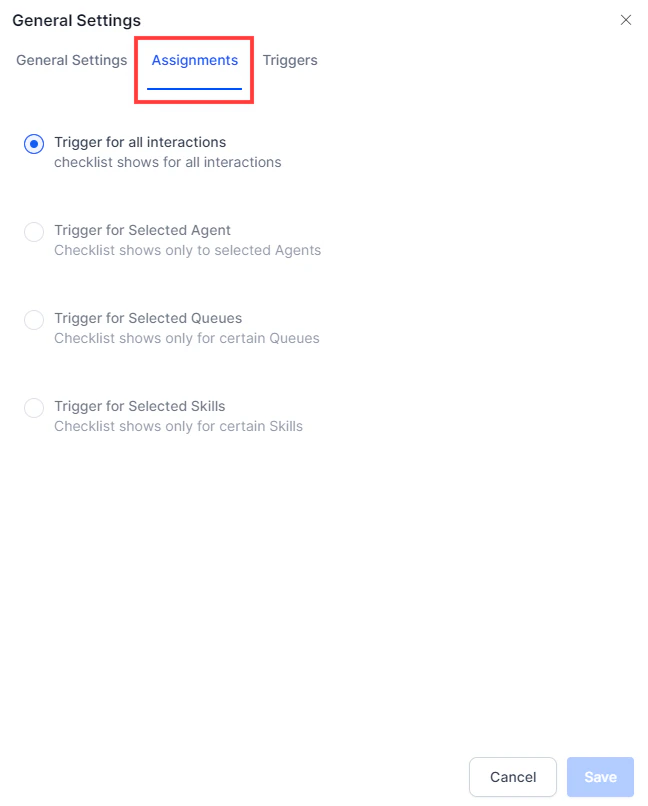
 4. Select the **Assignments** menu to define which agents see this playbook.
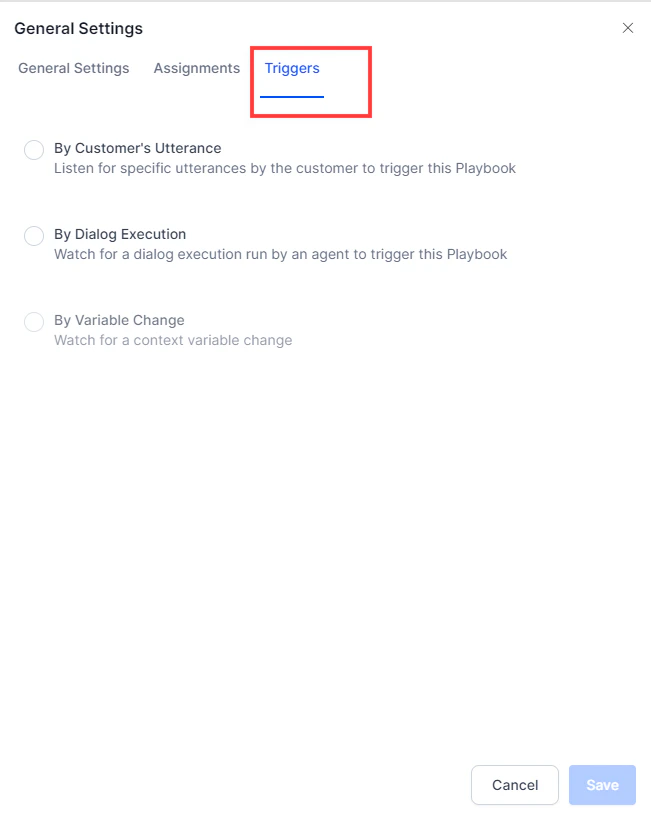
 5. Select the **Triggers** menu to define when the playbook appears on the widget.
 6. Choose a trigger type:
**By Customer's Utterance:**
1. Enter an utterance. The AI generates similar utterances with frequency data.
2. Select the utterances to include.
3. Select **Add**.
**By Dialog Execution:**
1. Select a Dialog Task from the **Automation** list.
2. Select when the playbook triggers:
* **Initiated** — triggers when the Dialog Task starts.
* **Completed** — triggers when the Dialog Task finishes.
7. Select **Save**.
***
## Configure Playbook Steps
### Stages and Steps
Playbooks are organized into **Stages** (primary groupings) and **Steps** (tasks within each stage). Primary playbooks have Open and Close stages by default. Dynamic playbooks start with no stages — you add them manually.
### Create a Step in a Primary Playbook
1. Open the playbook and select **+ Add Step**.
2. Enter a **Step Title** and **Step Body**.
3. To allow sending the step content to the customer, enable **Enable send/copy button** (available for Voice channel only).
4. Select **Add Buttons** and choose **Yes/No** confirmation buttons.
* **Yes** — marks the step as complete.
* **No** — marks the step as incomplete.
5. Optionally change button colors or delete buttons.
6. Select **Save**.
### Create a Step in a Dynamic Playbook
1. Open the Dynamic Playbook and select **+ Add Stage**.
2. Enter a stage name and select the tick mark.
3. Select **+ Add Step**, then follow steps 2-6 from [Create a Step in a Primary Playbook](#create-a-step-in-a-primary-playbook).
***
## Step Adherence
Step adherence tracks whether an agent completed a step. By default, agents mark steps complete manually. You can configure automatic adherence based on utterances or dialog execution.
**To configure automatic adherence:**
1. Open the playbook and select **+ Add Step**.
2. Select the **Step Adherence** button.
3. Choose an adherence method:
**By Utterance:**
1. Select **Agent Utterance** or **Customer Utterance**.
2. Enter an utterance. The AI suggests similar options with frequency data.
3. Select the utterances to include.
4. Select **Apply**.
**By Dialog Execution:**
1. Select a Dialog Task from the **Automation** list.
2. Select when adherence is recorded:
* **Initiated** — step is marked complete when the task starts.
* **Completed** — step is marked complete when the task finishes.
4. Select **Apply**.
***
## Assign a Playbook
Control which agents see the playbook.
1. Open the playbook and select the **Assign** button in General Settings.
2. Choose an assignment option:
| Option | Behavior |
| -------------------------------- | ---------------------------------------------- |
| **Trigger for all Interactions** | Visible to all agents for all interactions. |
| **Trigger for Selected Agents** | Visible only to the selected agents or groups. |
3. Select **Save**.
***
## Edit a Playbook
1. Sign in to the XO Platform.
2. Select **Configuration** > **Playbook**.
3. Select **Edit** on the playbook.
6. Choose a trigger type:
**By Customer's Utterance:**
1. Enter an utterance. The AI generates similar utterances with frequency data.
2. Select the utterances to include.
3. Select **Add**.
**By Dialog Execution:**
1. Select a Dialog Task from the **Automation** list.
2. Select when the playbook triggers:
* **Initiated** — triggers when the Dialog Task starts.
* **Completed** — triggers when the Dialog Task finishes.
7. Select **Save**.
***
## Configure Playbook Steps
### Stages and Steps
Playbooks are organized into **Stages** (primary groupings) and **Steps** (tasks within each stage). Primary playbooks have Open and Close stages by default. Dynamic playbooks start with no stages — you add them manually.
### Create a Step in a Primary Playbook
1. Open the playbook and select **+ Add Step**.
2. Enter a **Step Title** and **Step Body**.
3. To allow sending the step content to the customer, enable **Enable send/copy button** (available for Voice channel only).
4. Select **Add Buttons** and choose **Yes/No** confirmation buttons.
* **Yes** — marks the step as complete.
* **No** — marks the step as incomplete.
5. Optionally change button colors or delete buttons.
6. Select **Save**.
### Create a Step in a Dynamic Playbook
1. Open the Dynamic Playbook and select **+ Add Stage**.
2. Enter a stage name and select the tick mark.
3. Select **+ Add Step**, then follow steps 2-6 from [Create a Step in a Primary Playbook](#create-a-step-in-a-primary-playbook).
***
## Step Adherence
Step adherence tracks whether an agent completed a step. By default, agents mark steps complete manually. You can configure automatic adherence based on utterances or dialog execution.
**To configure automatic adherence:**
1. Open the playbook and select **+ Add Step**.
2. Select the **Step Adherence** button.
3. Choose an adherence method:
**By Utterance:**
1. Select **Agent Utterance** or **Customer Utterance**.
2. Enter an utterance. The AI suggests similar options with frequency data.
3. Select the utterances to include.
4. Select **Apply**.
**By Dialog Execution:**
1. Select a Dialog Task from the **Automation** list.
2. Select when adherence is recorded:
* **Initiated** — step is marked complete when the task starts.
* **Completed** — step is marked complete when the task finishes.
4. Select **Apply**.
***
## Assign a Playbook
Control which agents see the playbook.
1. Open the playbook and select the **Assign** button in General Settings.
2. Choose an assignment option:
| Option | Behavior |
| -------------------------------- | ---------------------------------------------- |
| **Trigger for all Interactions** | Visible to all agents for all interactions. |
| **Trigger for Selected Agents** | Visible only to the selected agents or groups. |
3. Select **Save**.
***
## Edit a Playbook
1. Sign in to the XO Platform.
2. Select **Configuration** > **Playbook**.
3. Select **Edit** on the playbook.
 4. Select **Settings** and make your changes.
5. Select **Update**.
***
## Delete a Playbook
1. Sign in to the XO Platform.
2. Select **Configuration** > **Playbook**.
3. Select **Delete** on the playbook.
4. Select **Settings** and make your changes.
5. Select **Update**.
***
## Delete a Playbook
1. Sign in to the XO Platform.
2. Select **Configuration** > **Playbook**.
3. Select **Delete** on the playbook.
 4. Confirm by selecting **Yes**.
***
## Edit a Step
1. Sign in to the XO Platform.
2. Select **Configuration** > **Playbook**.
3. Select **Edit** on the playbook.
4. Select the step you want to edit.
5. Make changes on the **Step Configuration** page.
6. Select **Update**.
***
## Delete a Step
1. Sign in to the XO Platform.
2. Select **Configuration** > **Playbook**.
3. Select **Edit** on the playbook.
4. Select **Delete** on the step.
4. Confirm by selecting **Yes**.
***
## Edit a Step
1. Sign in to the XO Platform.
2. Select **Configuration** > **Playbook**.
3. Select **Edit** on the playbook.
4. Select the step you want to edit.
5. Make changes on the **Step Configuration** page.
6. Select **Update**.
***
## Delete a Step
1. Sign in to the XO Platform.
2. Select **Configuration** > **Playbook**.
3. Select **Edit** on the playbook.
4. Select **Delete** on the step.
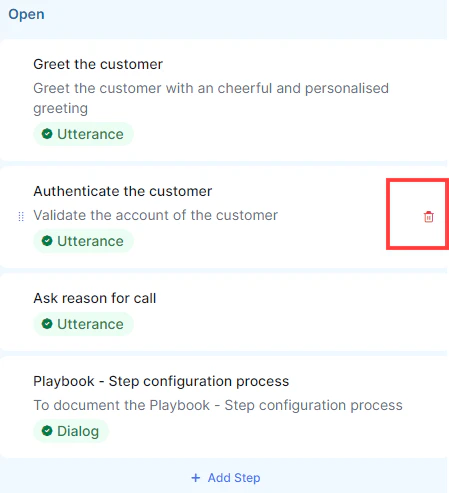 5. Confirm by selecting **Yes** in the **Delete Step** window.
***
Built with [Mintlify](https://mintlify.com).
5. Confirm by selecting **Yes** in the **Delete Step** window.
***
Built with [Mintlify](https://mintlify.com).